|
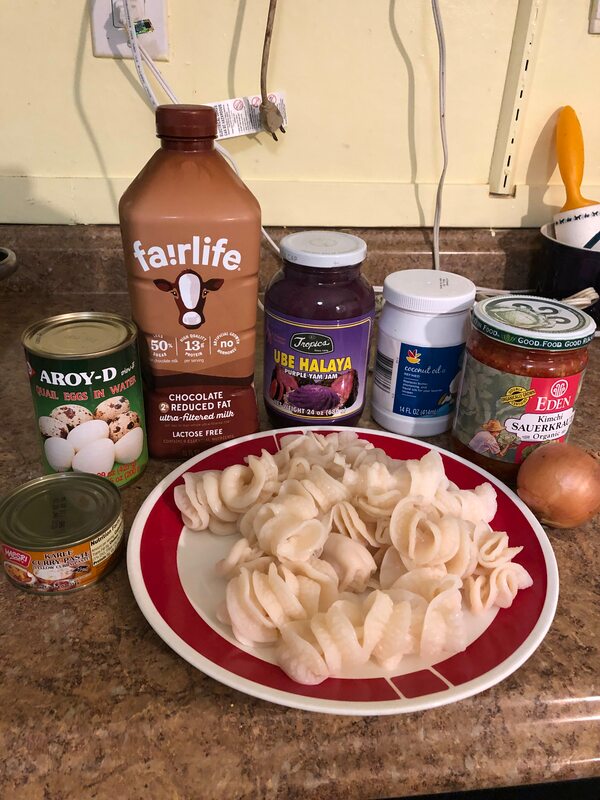
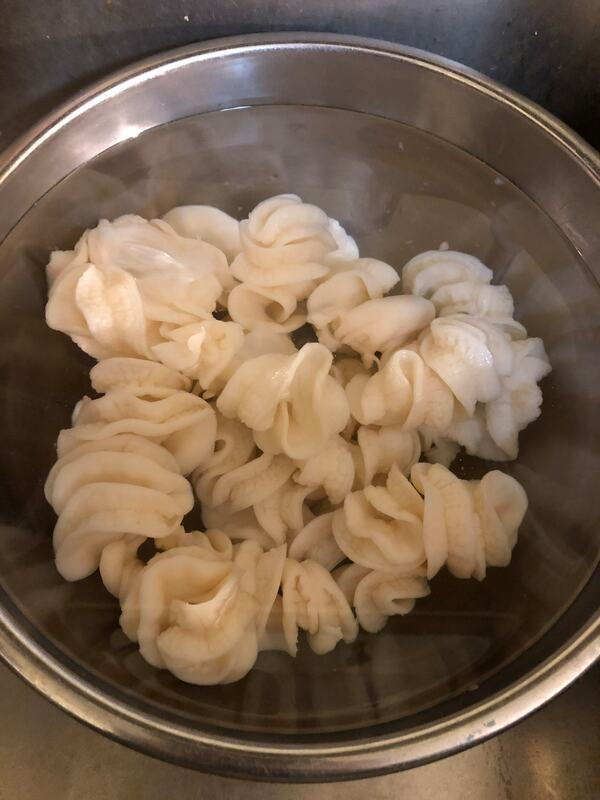
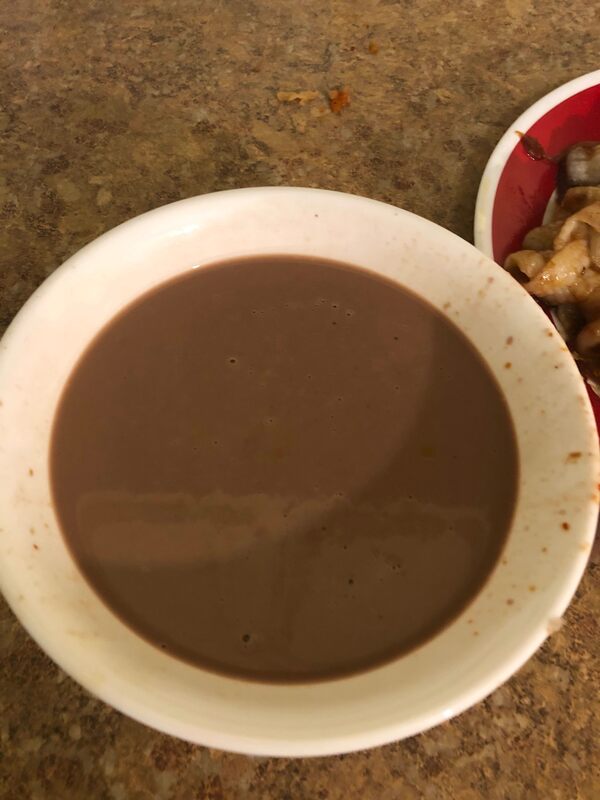
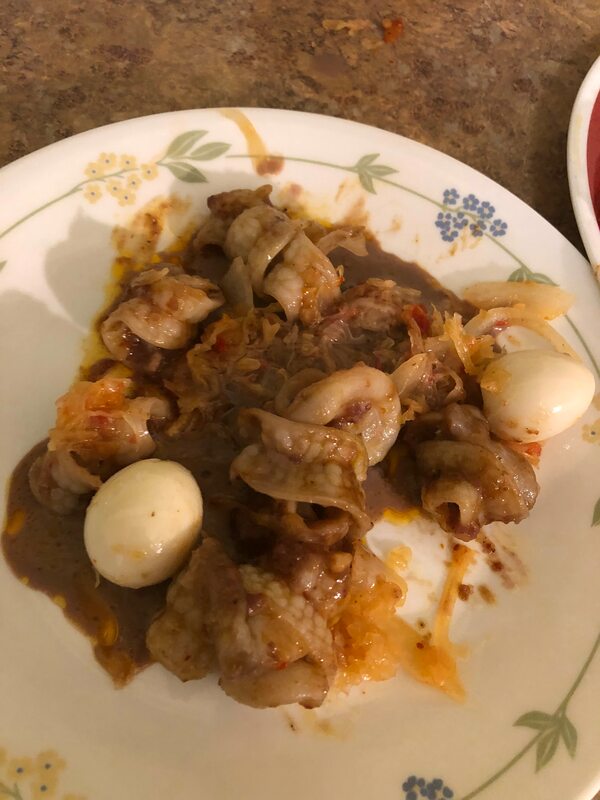
To celebrate my upcoming hysterectomy and ovary removal, I managed to find some pig uterus, fried it, and coated it in a chocolate sauce(people with a uterus sure do crave chocolate during their periods!). Tastes like calamari! There aren't many recipes on the internet for cooking pig uterus and there certainly isn't one that incorporates chocolate into it- until now! I didn't have high hopes for this recipe given this article that said pig uterus was the scariest food found at Ranch 99, an Asian supermarket chain on the West Coast. But when it comes to new food, one must keep an open mind and an empty belly(sounds like a Chinese proverb actually!). I found my pig uterus at an Asian supermarket that happened to also sell live frogs. Yea there was a lot of weird shit in that supermarket for sale, like duck heads(which I of course bought for a future video), black chicken, beef penis, pig snouts, cow intestines, you name the organ, that supermarket had it for sale. For someone who loves weird food it was as if I died and went to heaven! I read one article that said you needed to soak the uteri for 24 hours, which I forgot to do, so I improvised and soaked it for 3, changing the salted water every hour. The smell wasn't too bad actually- it smells just like a fish market(if you're into that sorta thing). I've smelled a lot worse. I tried boiling and simmering a chocolate milk sauce but I destroyed my large saucepot in the process due to the sauce burning. Chocolate milk doesn't boil well apparently. I didn't include any of that in the final video. Turns out mixing the ingredients without cooking works just as well. I'm also having my ovaries removed, so to celebrate those being taken out, I served the uteri with some quail eggs, which just taste like deviled (chicken) eggs honestly. If you know me and my gender transition, you might be asking- is a future video involving some sort of animal penis and testicles in the works(to celebrate when I have phalloplasty and scrotoplasty done)? Heck yeah! But that's not 'til later in 2019 at the earliest. My dad was too disgusted to try pig uterus and all the other stuff in the recipe. HELPFUL LINKS: Yellow Curry Paste: www.amazon.com/4oz-Green-Yellow-Curry-Pastes/dp/B000QU3JM0/ref=sr_1_8_a_it?ie=UTF8&qid=1547312389&sr=8-8& Purple Yam Jam: www.amazon.com/24oz-Tropics-Halaya-Purple-Pack/dp/B01J1B7IV2/ref=sr_1_2_a_it?ie=UTF8&qid=1547312408&sr=8-2& Quail Eggs: www.amazon.com/ROM-AMERICA-Aroy-D-Quail-water/dp/B06XSPTDNK/ref=sr_1_9_s_it?s=grocery&ie=UTF8&qid=1547312461&sr=1-9& You will need: For the cooking equipment: A knife A frying pan w/ spatula A large bowl A colander A bowl For the ingredients: 2 lbs. pig uterus(found at some Asiian supermarkets) Enough water to submerge the uterus for soaking Salt for soaking the uterus Coconut oil 1 chopped up onion Kimchi sauerkraut or cabbage 1 tsp. yellow curry paste(see HELPFUL LINKS) Purple yam jam(see HELPFUL LINKS) Quail eggs(see HELPFUL LINKS) For the sauce: Chocolate milk 1 tsp. yellow curry paste Purple yam jam Serve with Asian steamed bun(found at most Asian supermarkets) To soak the uterus: 1. Put the uteri in a large bowl and pour enough water to submerge it. Salt the water. Let the uteri soak for an hour. 2. Drain the water with a colander and put the uteri back in the large bowl. 3. Repeat steps 1 and 2 two or three more times. For the frying: 1. Chop up the pig uteri with a knife into the smallest pieces possible. You can also just tear the uteri into pieces with your hands, that works too. 2. Put coconut oil into a frying pan. Turn the stove on and melt the coconut oil. 3. Put the chopped onion and kimchi sauerkraut or cabbage into the pan. Saute until the onions are translucent. 4. Put more coconut oil into a frying pan. Turn the stove on and melt the coconut oil. 5. Put the uteri into the pan but don't overcrowd it. Add the curry paste and yam jam. 6. Combine all ingredients in the pan and move the uteri with a spatula to make sure it all gets fully cooked, which should take several minutes. For the sauce: 1. Mix all the sauce ingredients together in a bowl. To serve: 1. Pour the sauce onto the uteri, kimchi sauerkraut or cabbage, and onions. Top with quail eggs. 2. Serve with Asian steamed bun. Eat immediately as pig uterus doesn't keep well in the fridge overnight(or maybe it looked weird because of the purple yam jam and curry paste- either way I didn't want to risk my surgery being cancelled due to food poisoning so I trashed my leftovers).
1 Comment
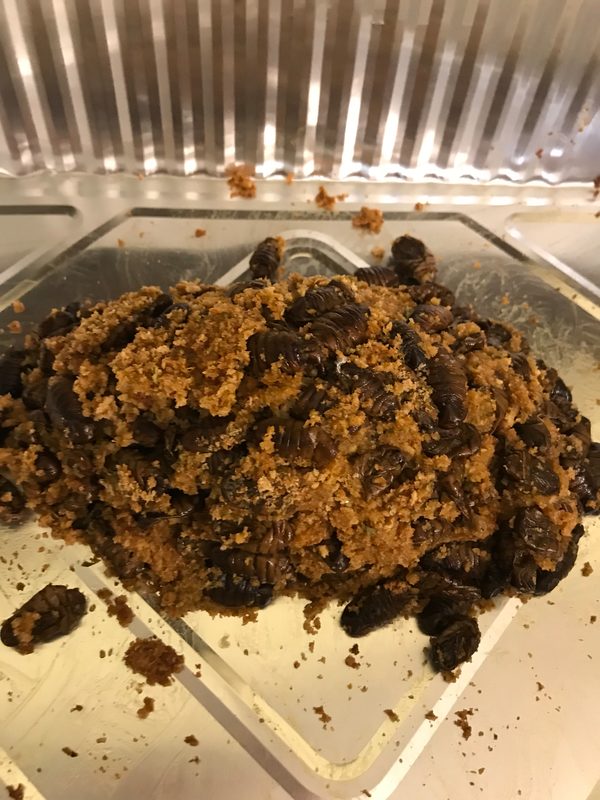
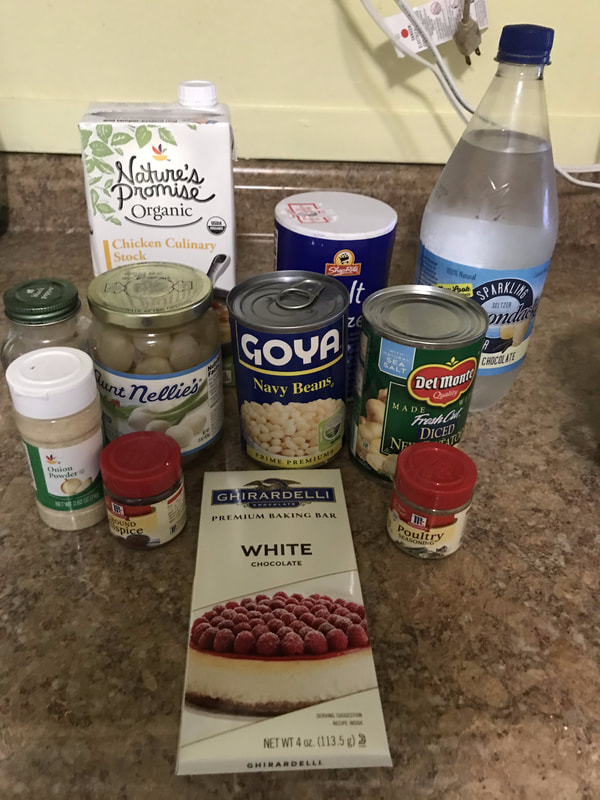
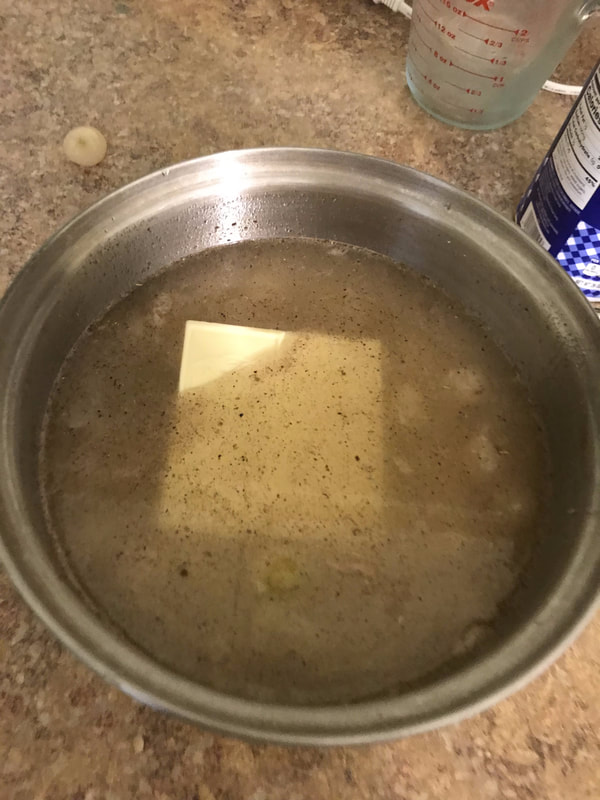
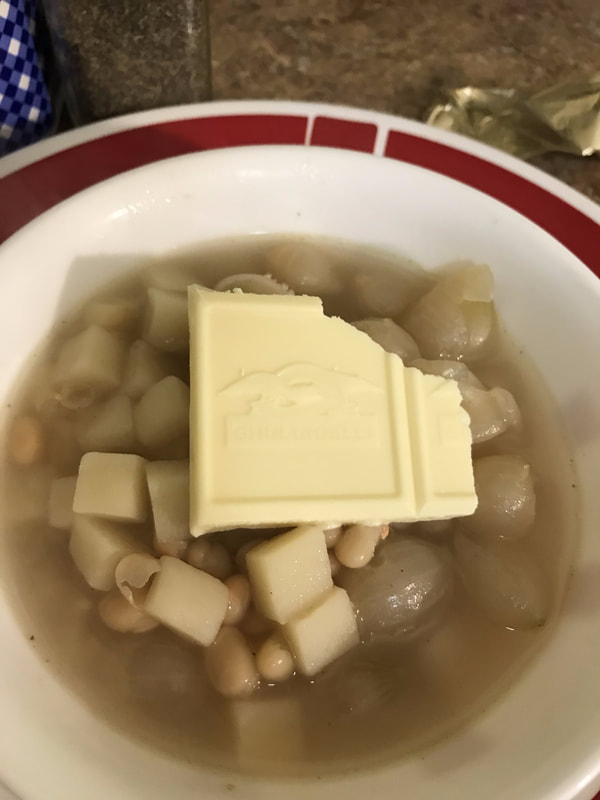
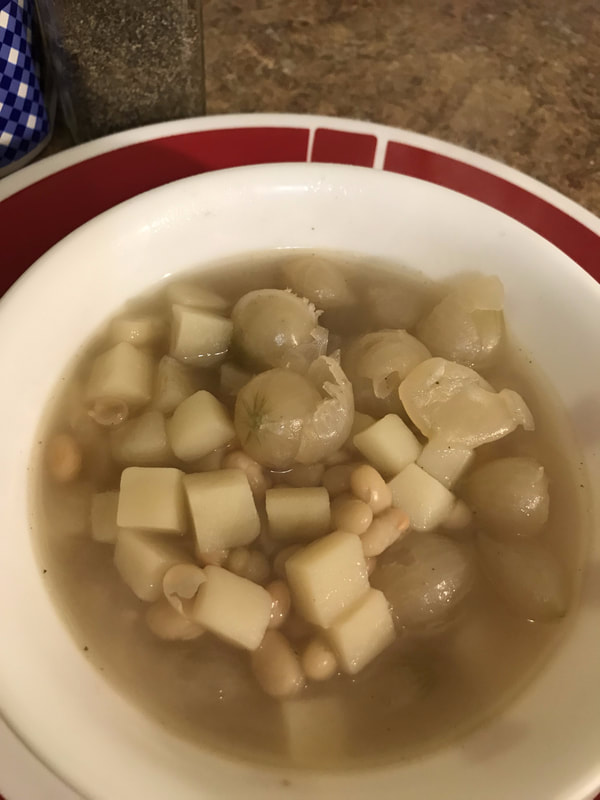
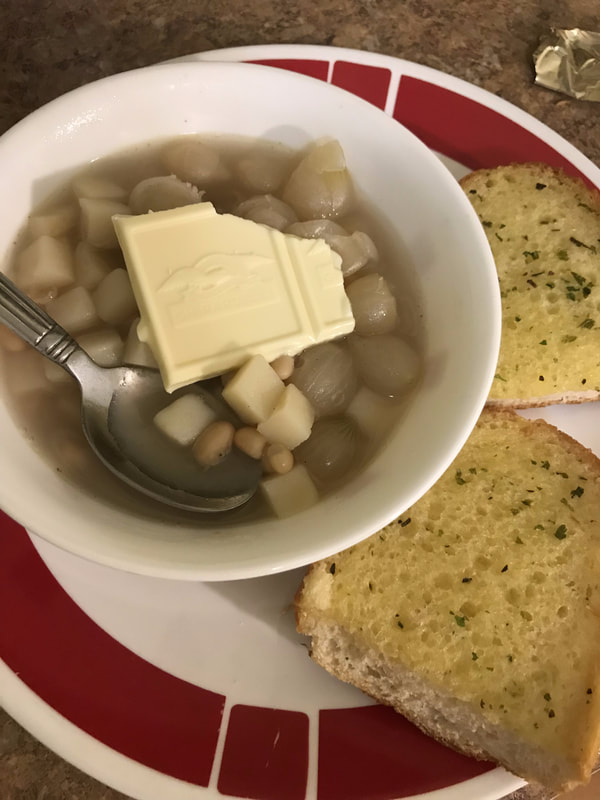
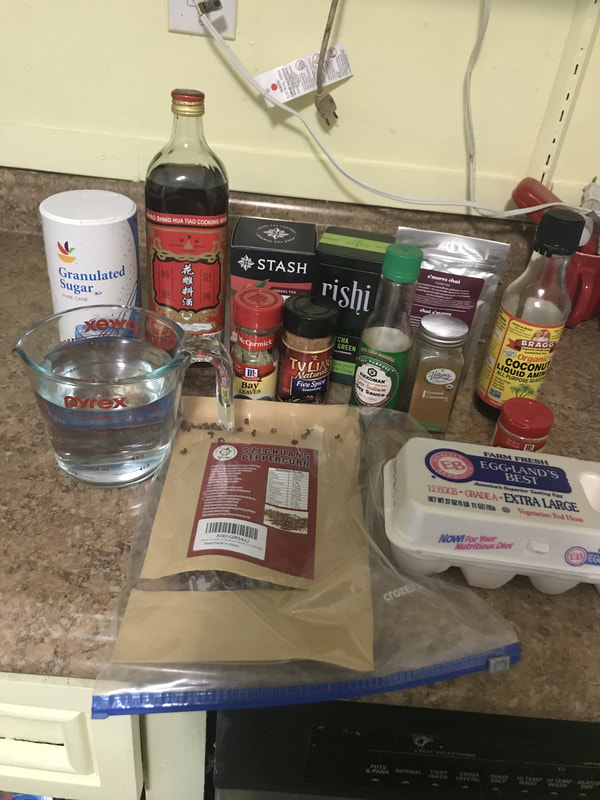
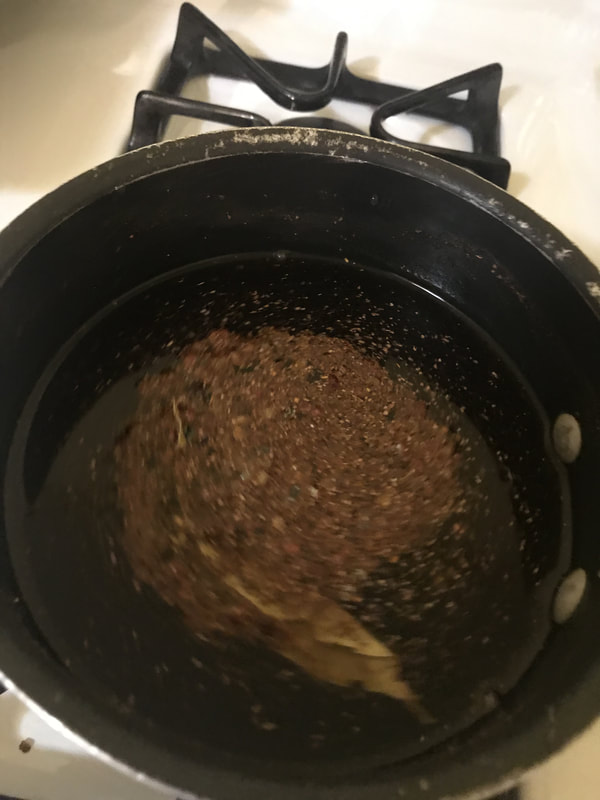
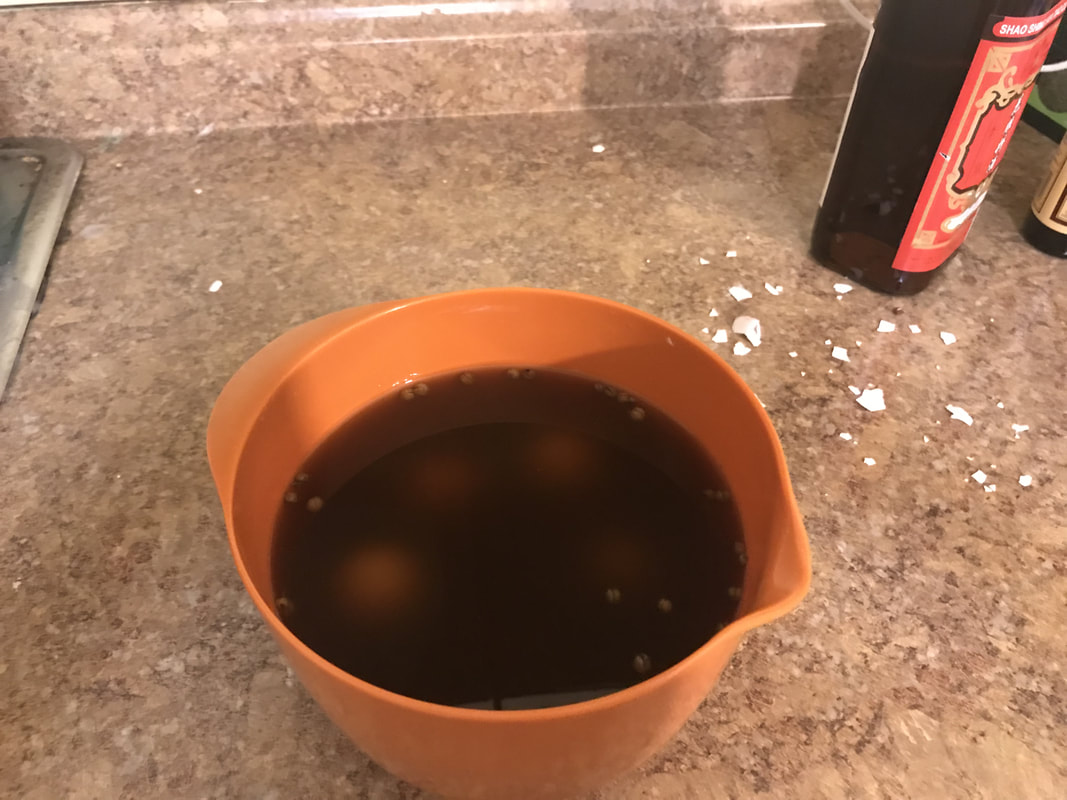
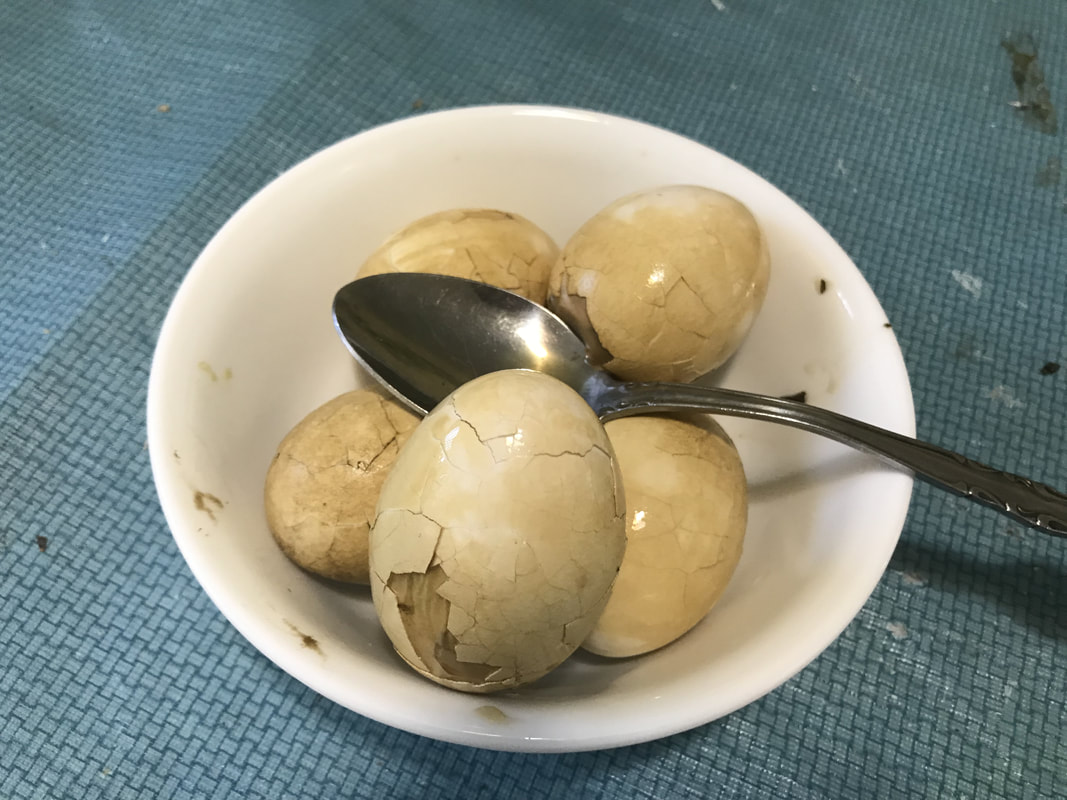
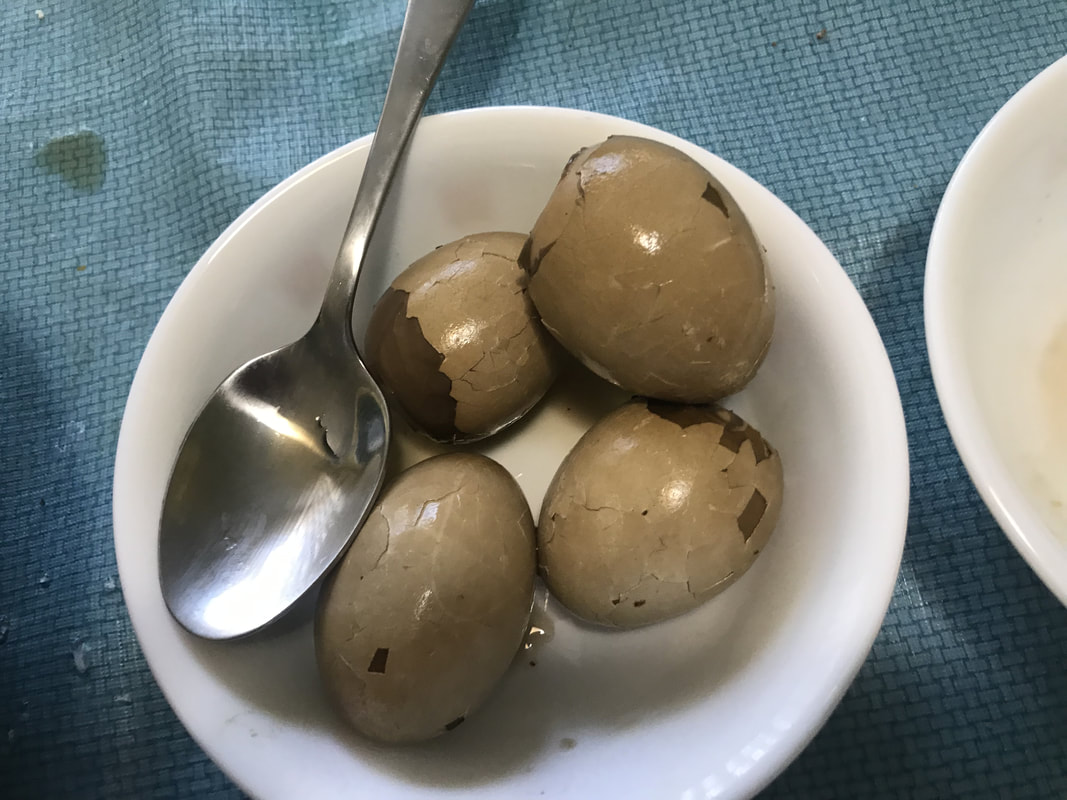
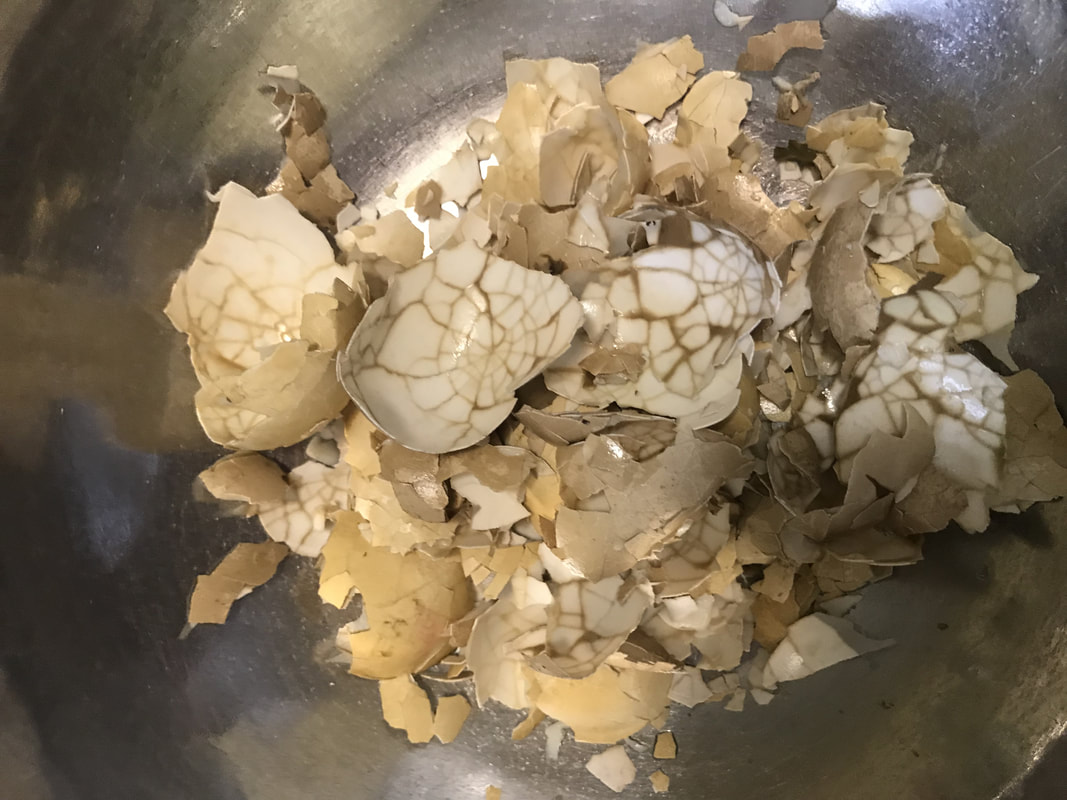
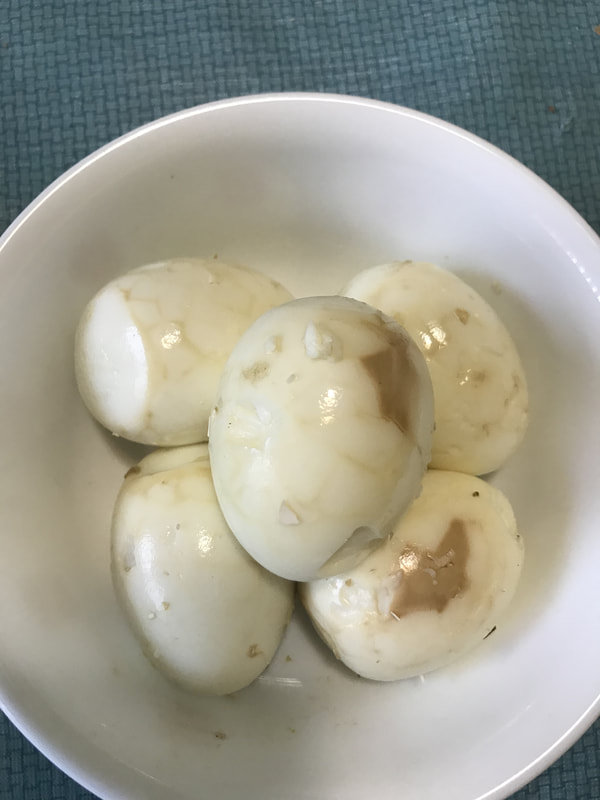
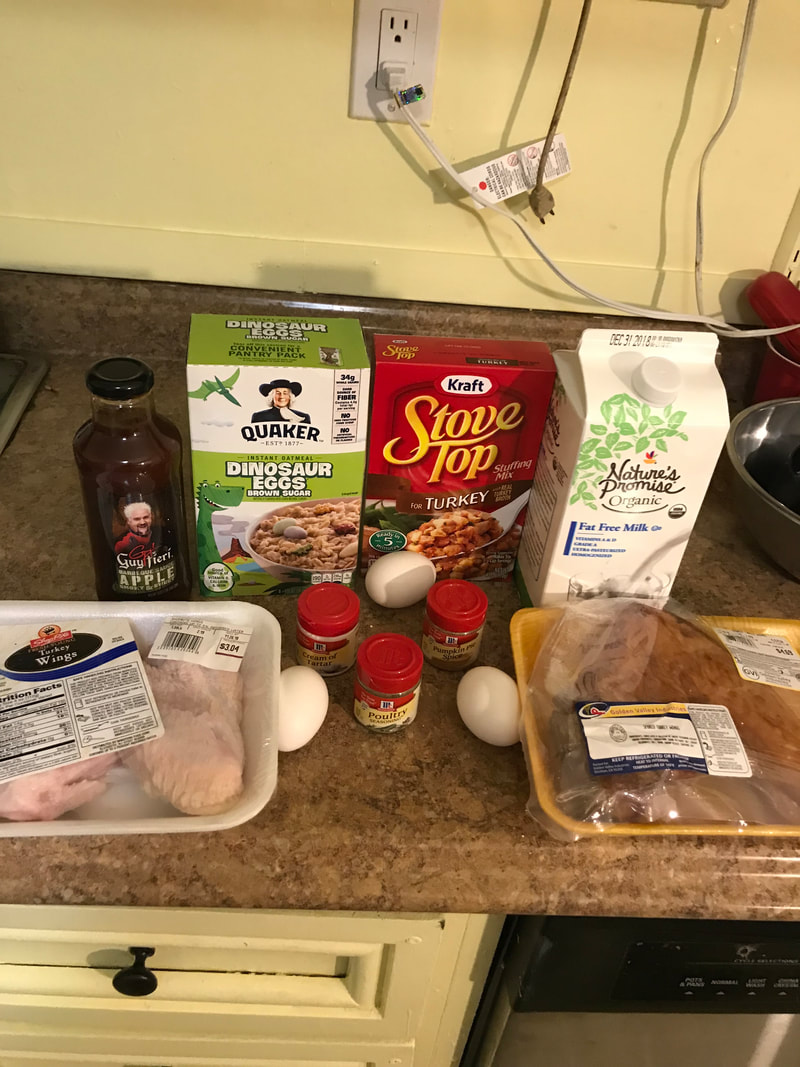
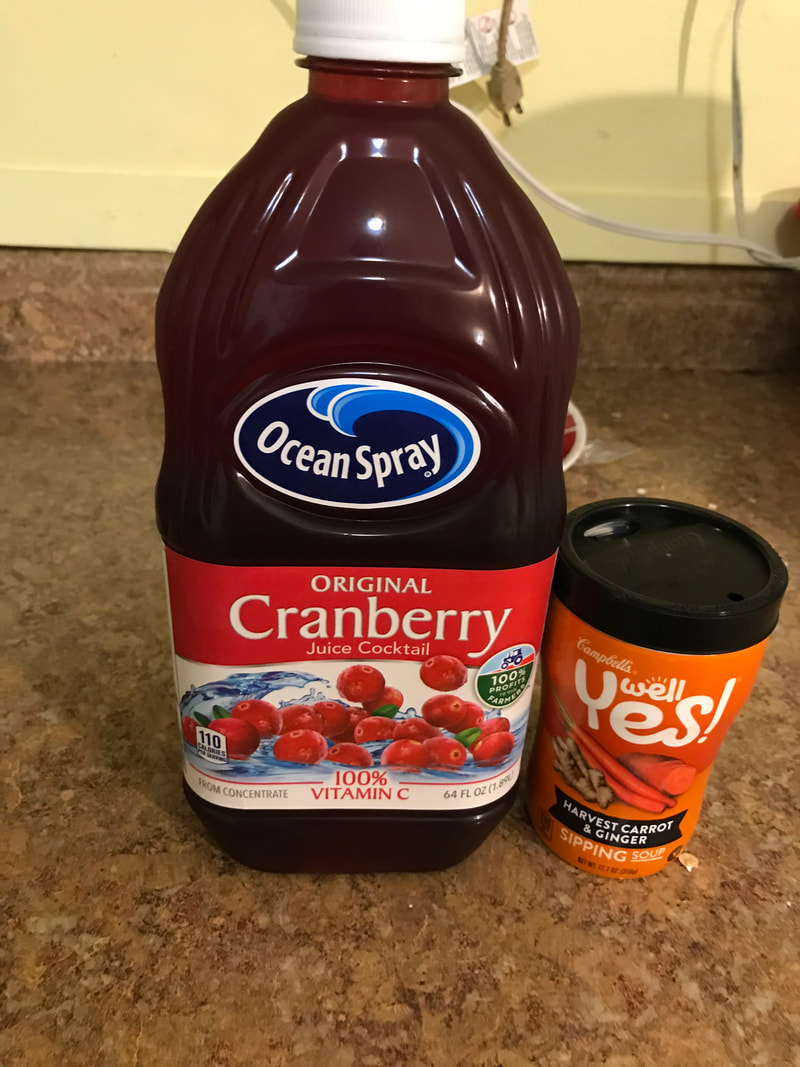
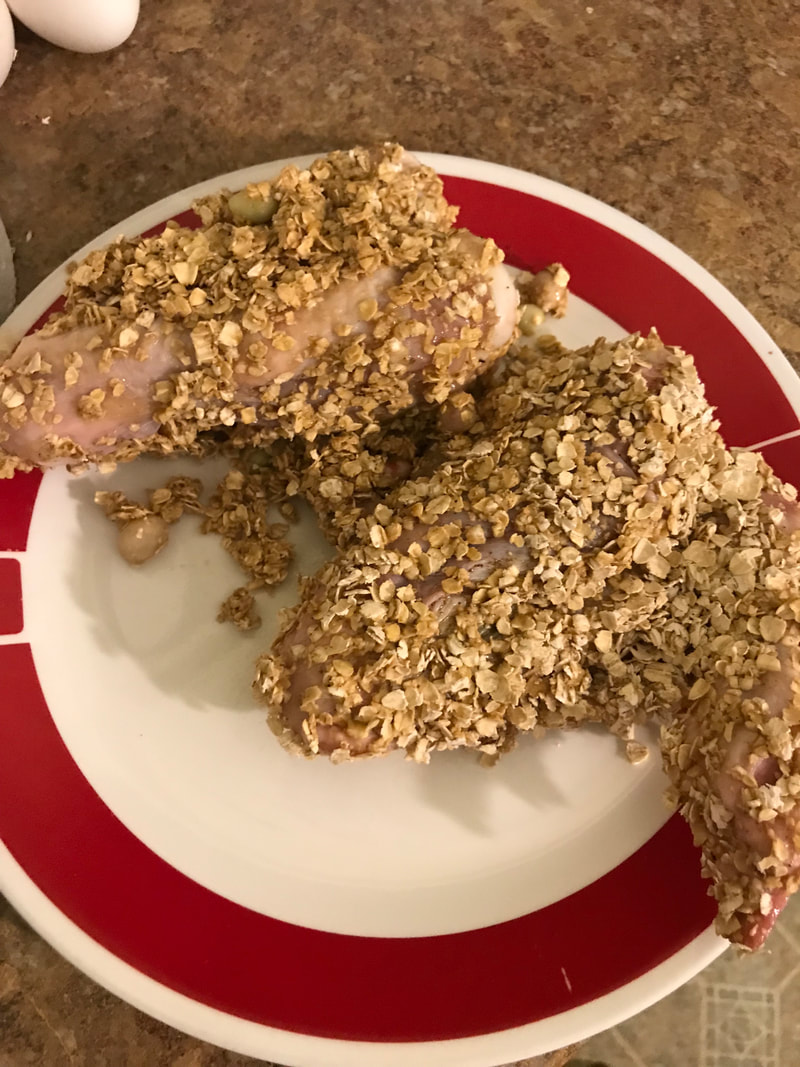
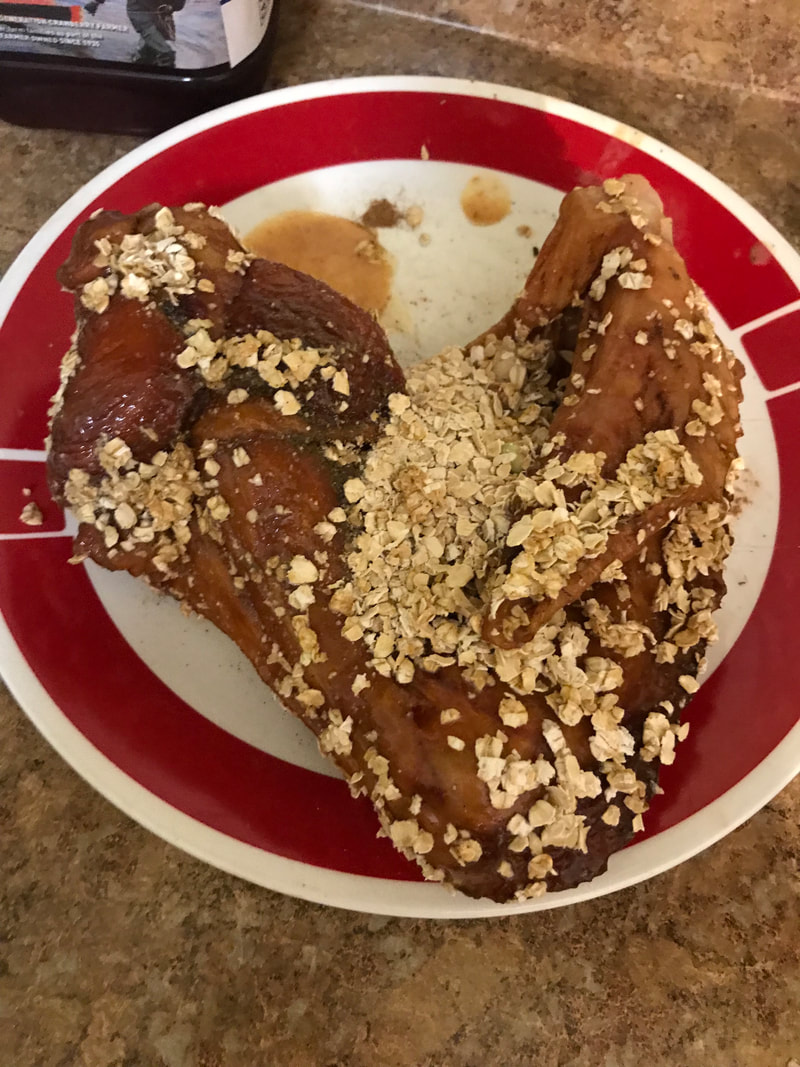
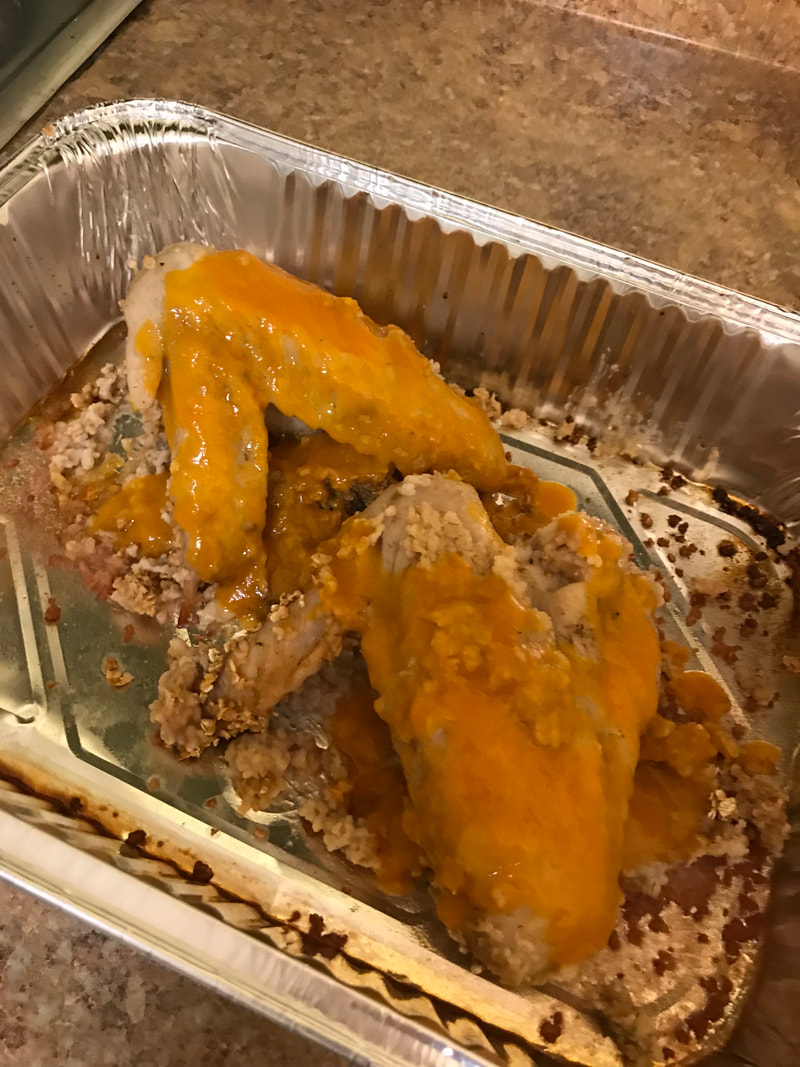
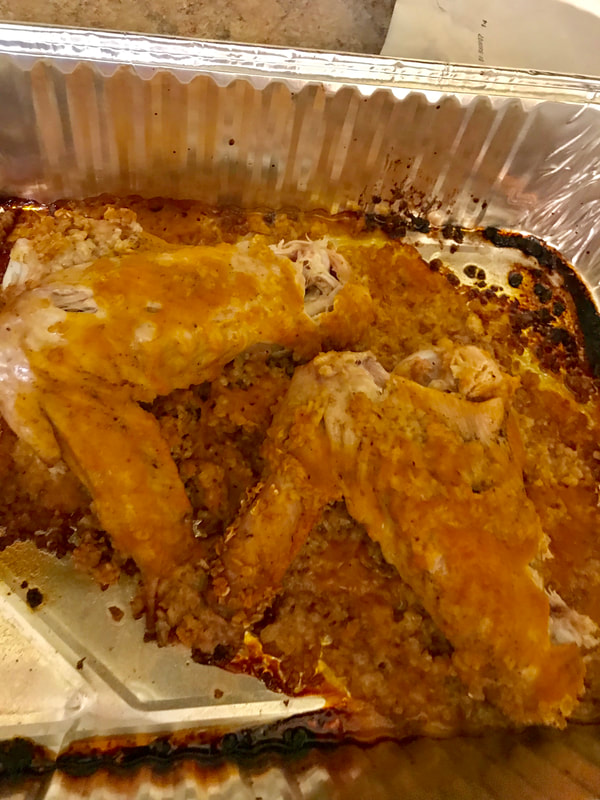
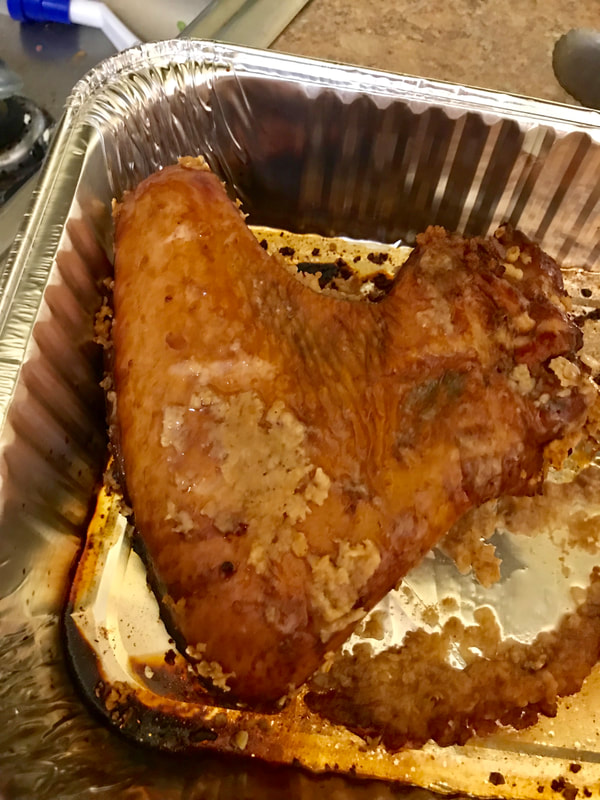
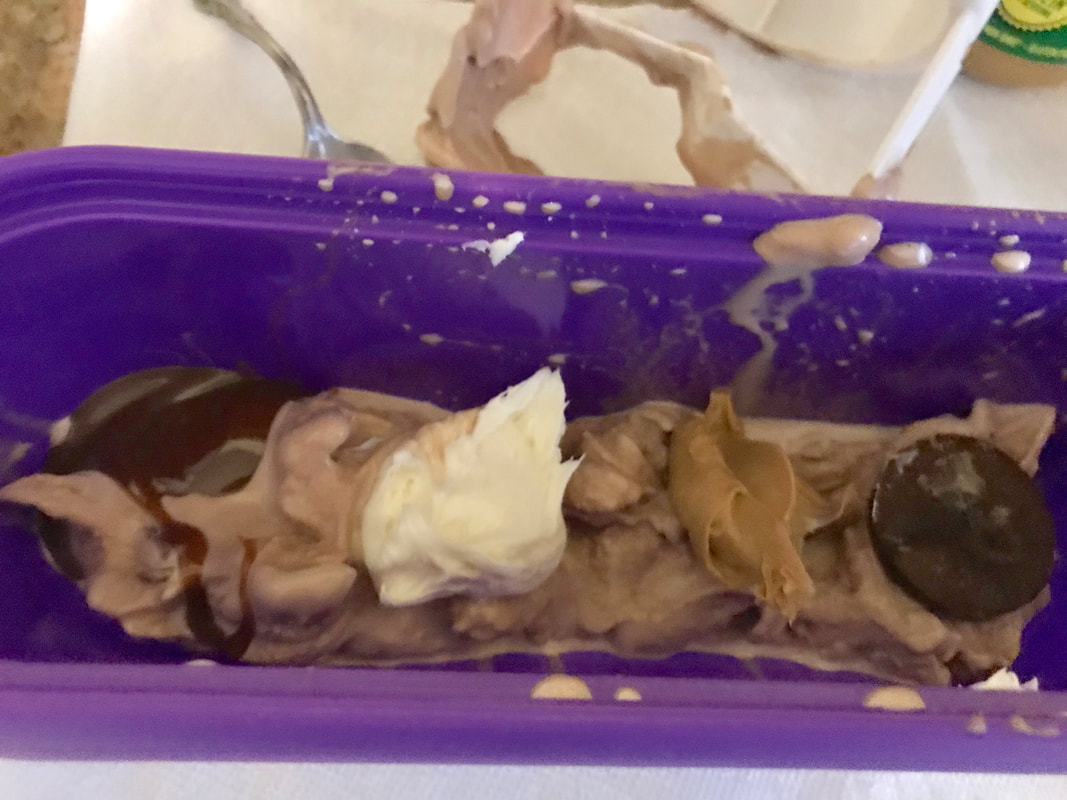
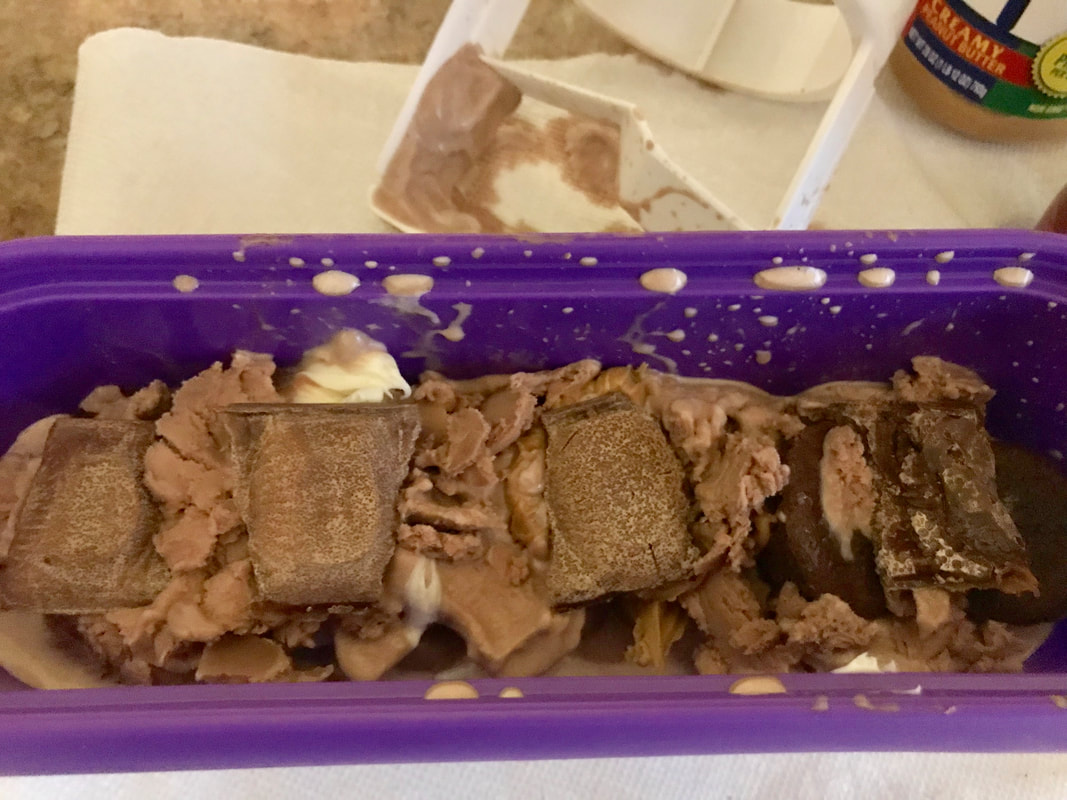
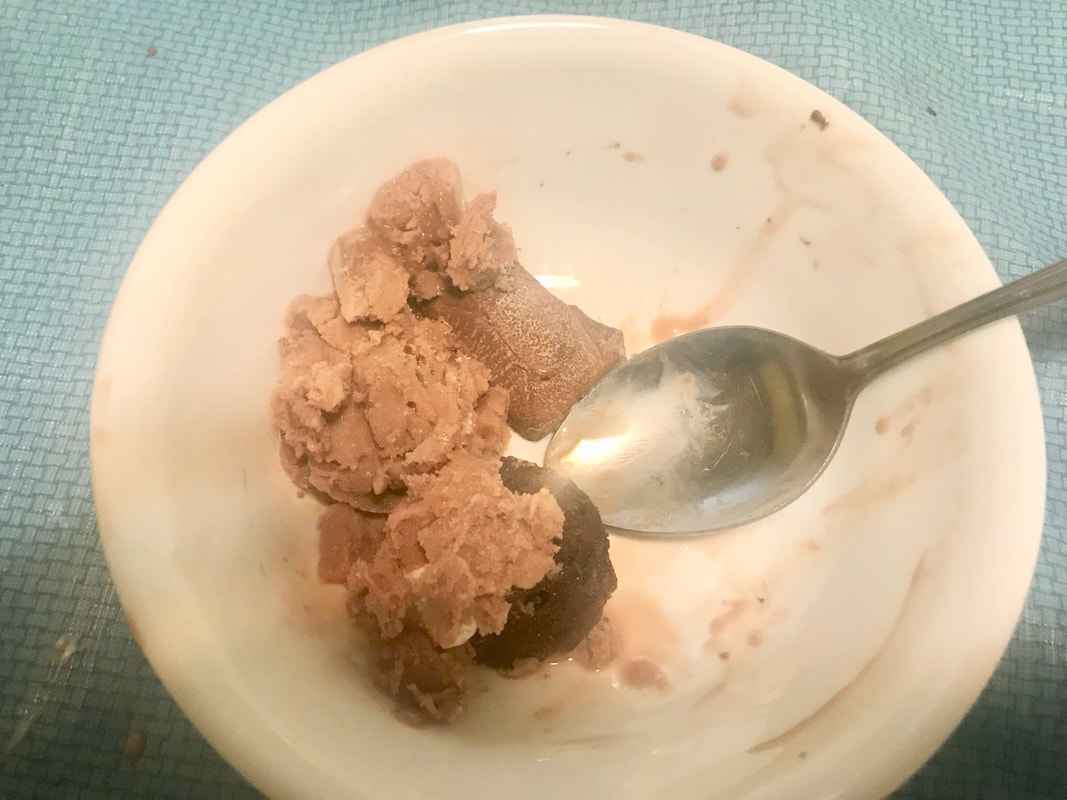
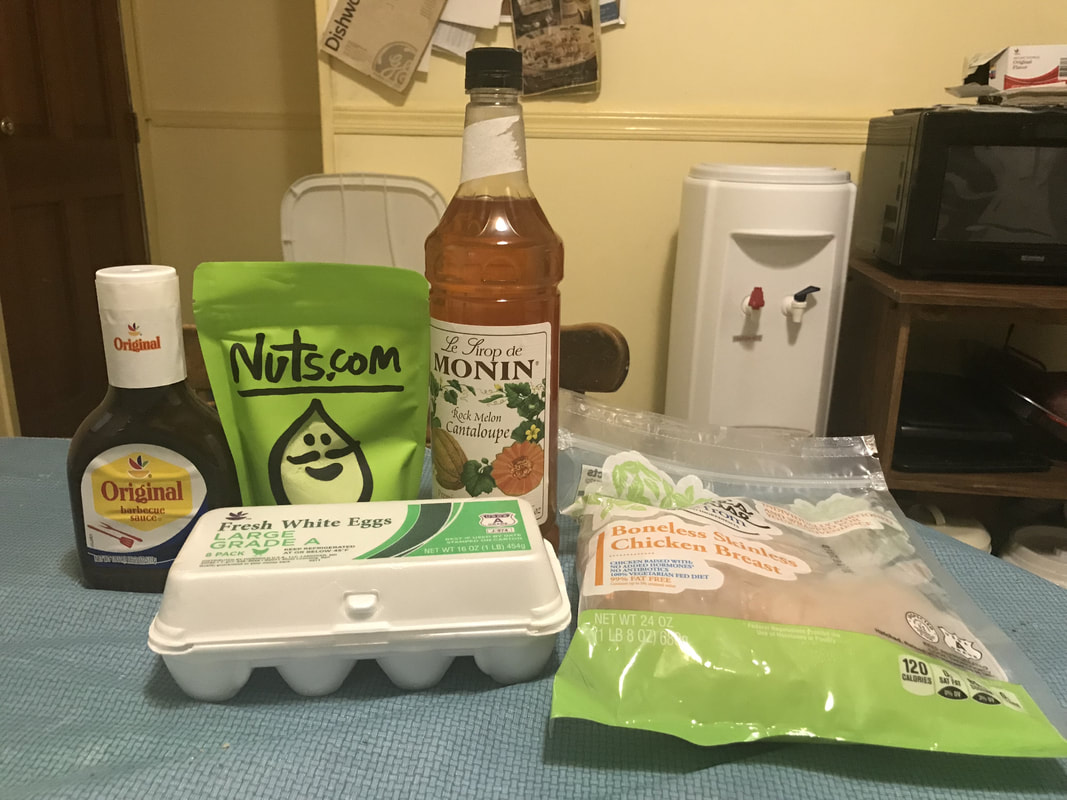
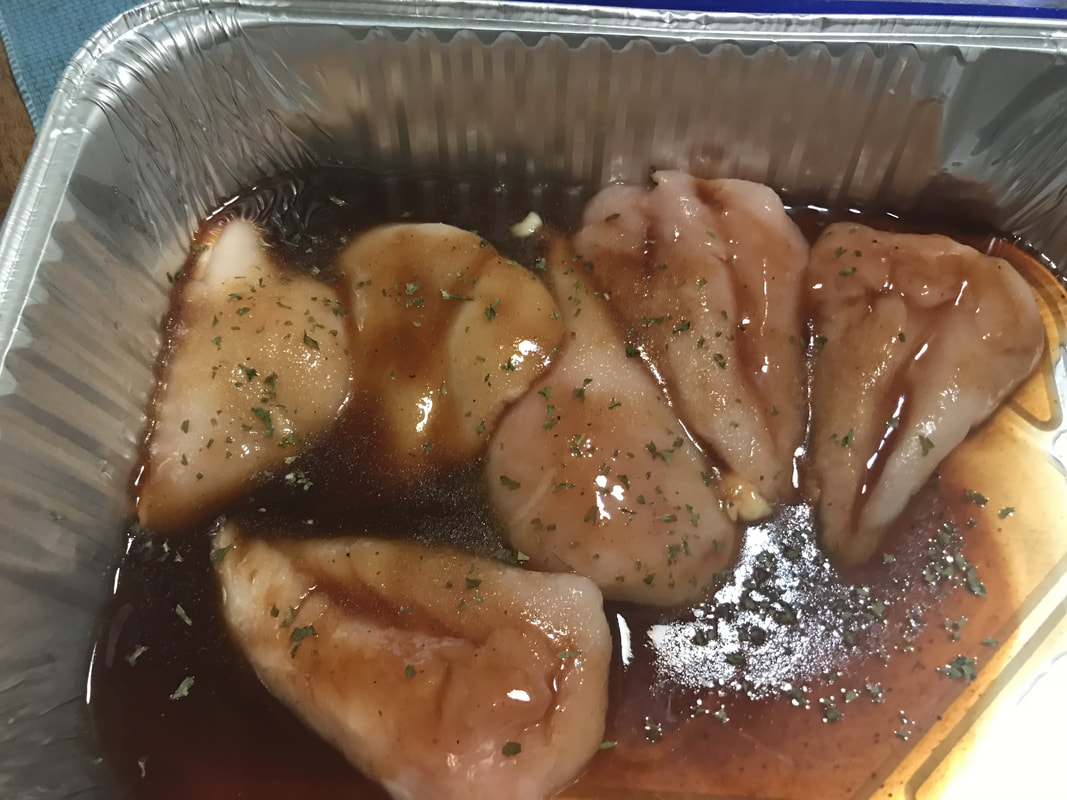
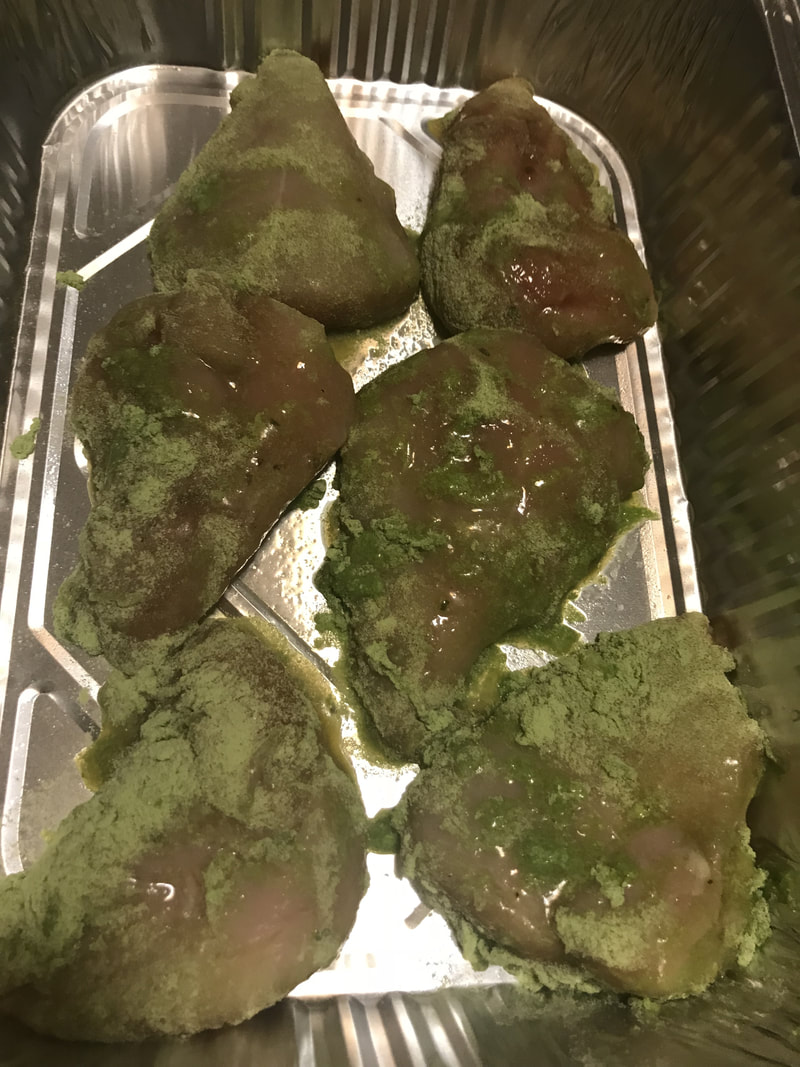
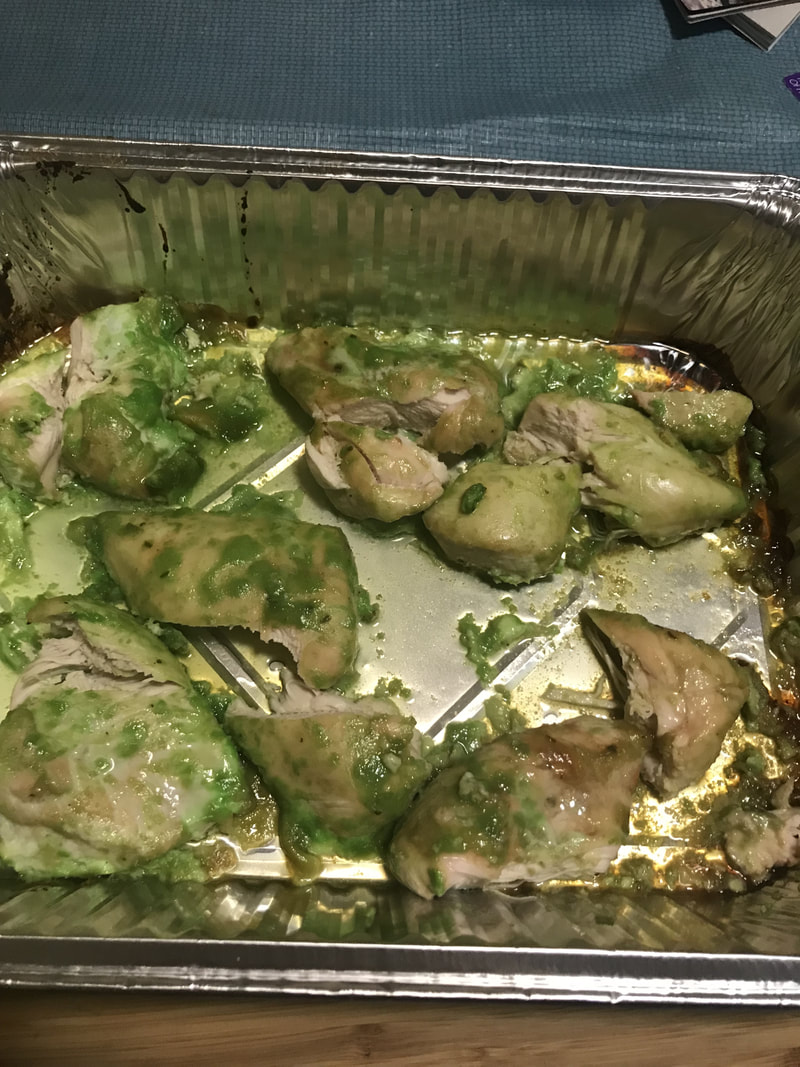
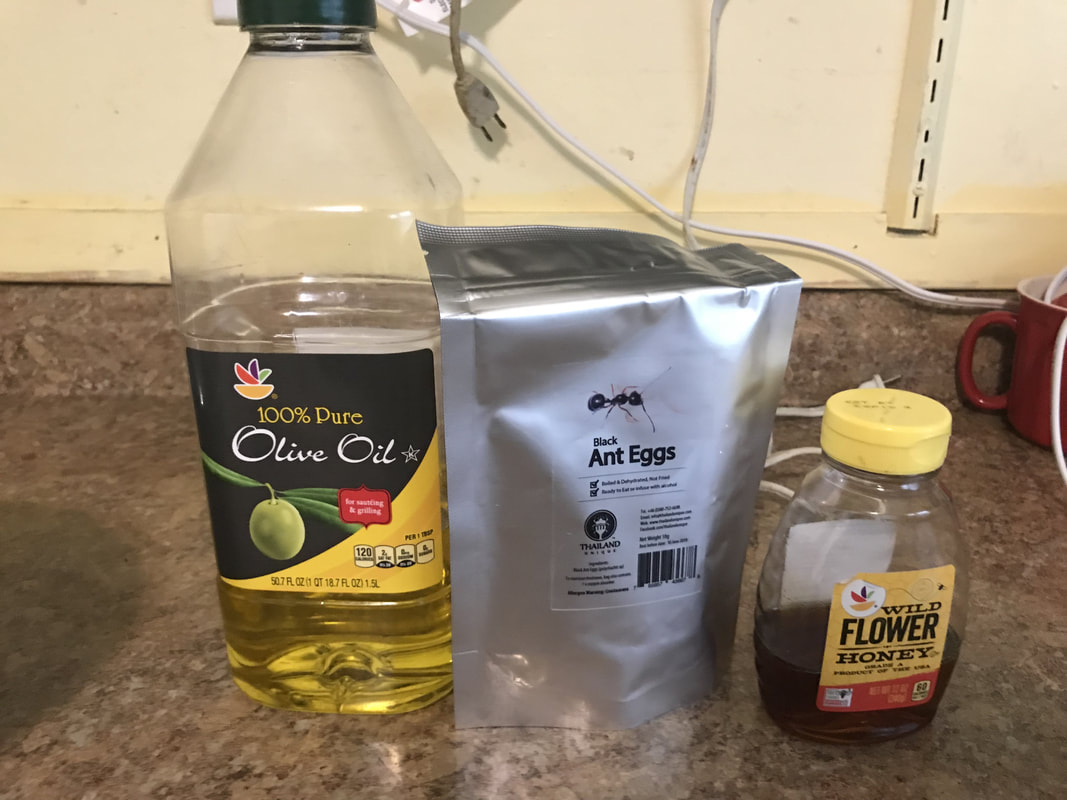
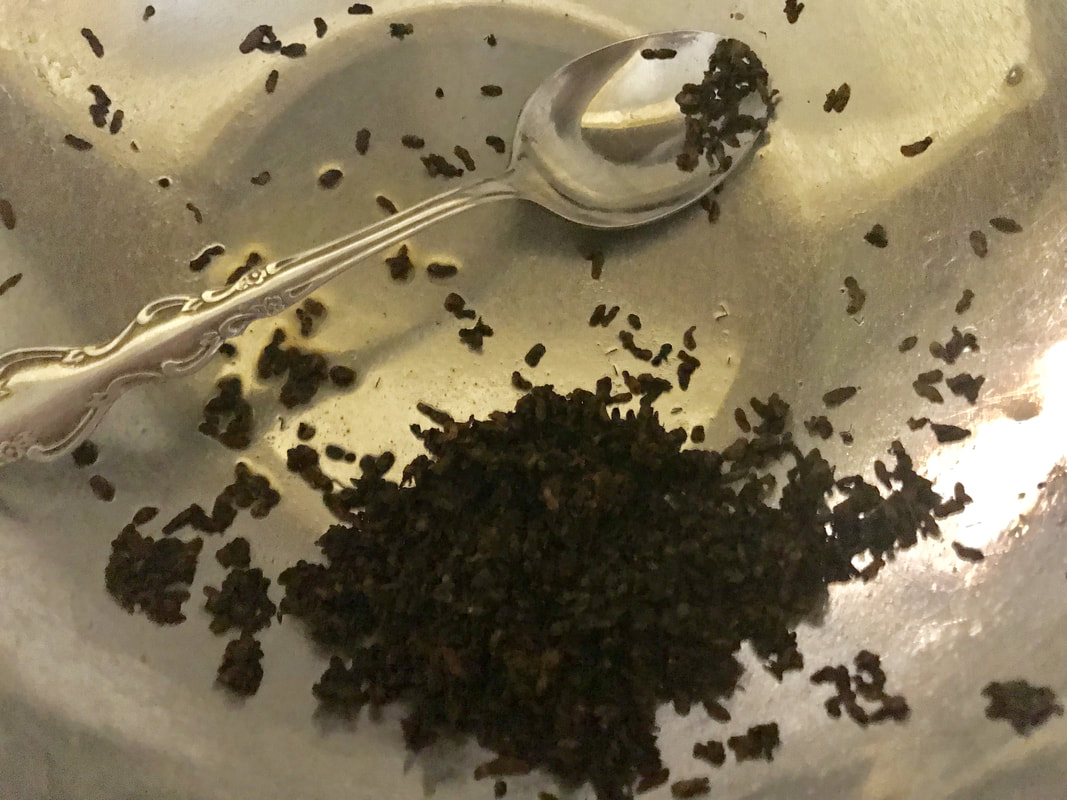
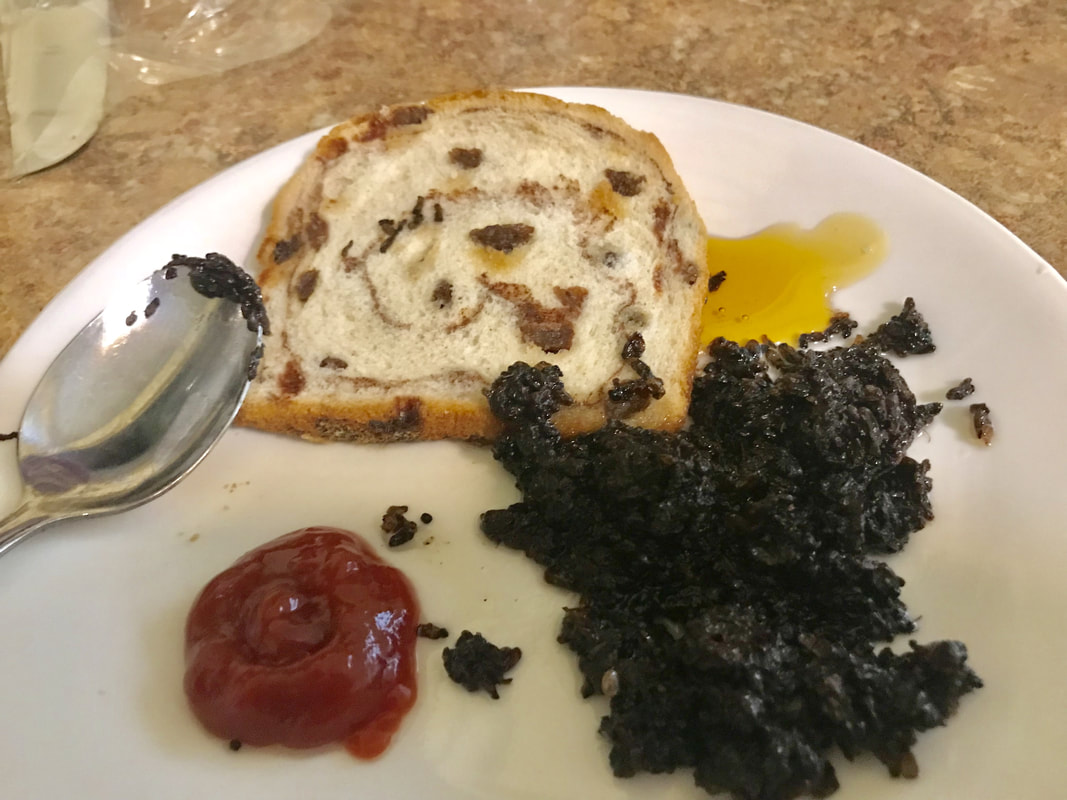
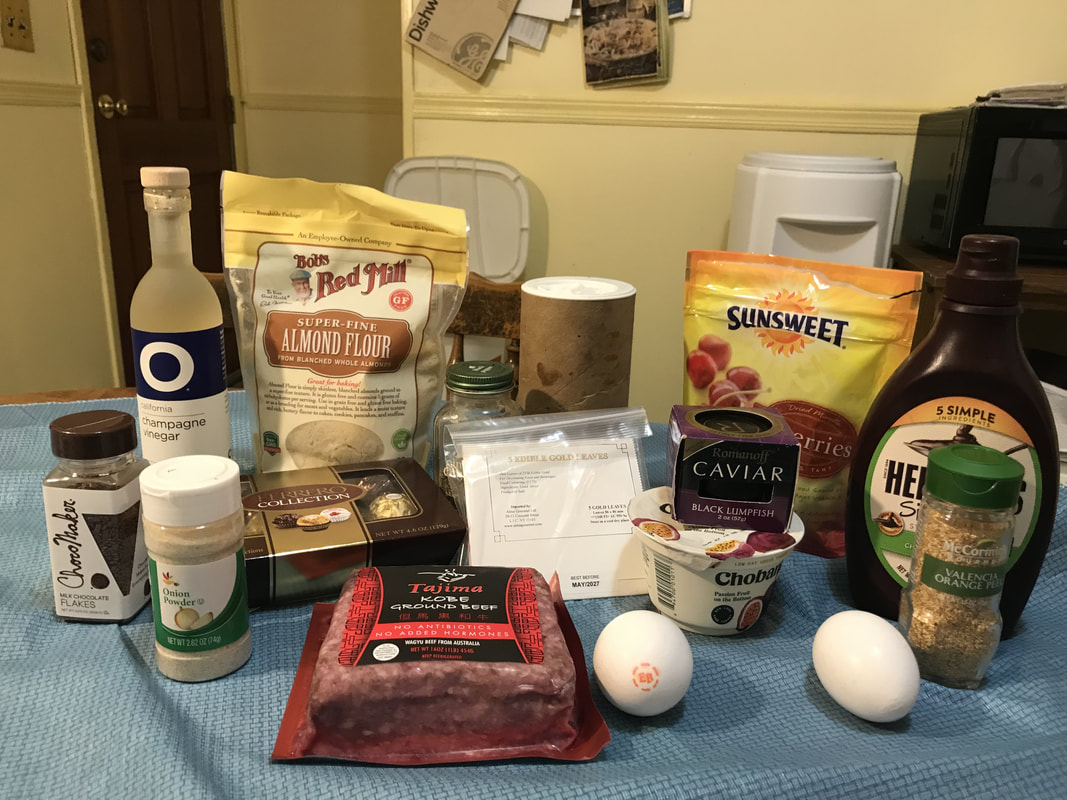
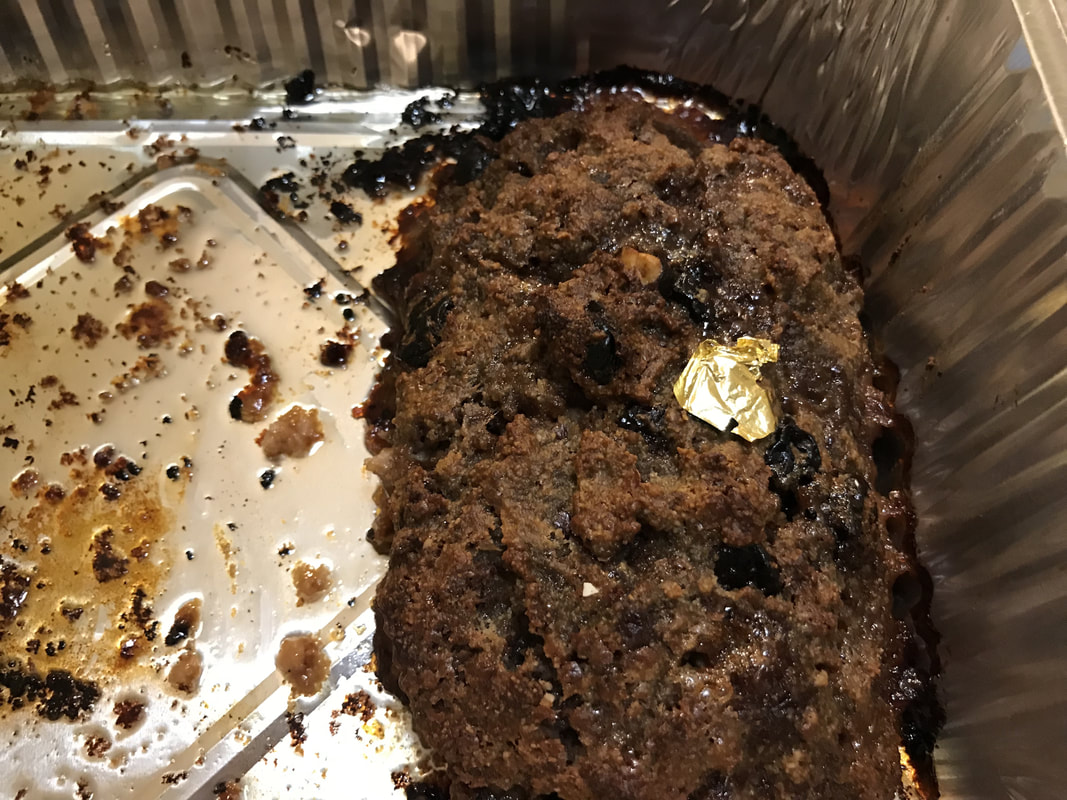
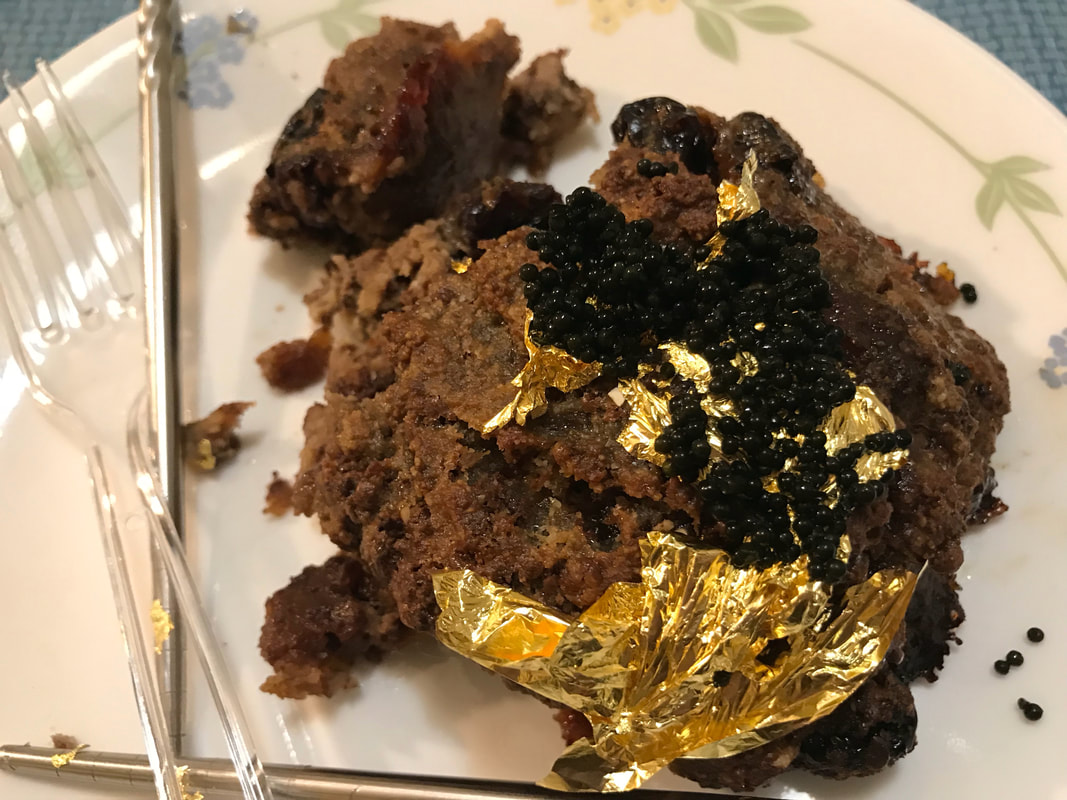
Start off 2019 with an entirely different kind of meatloaf- one made with insects, particularly silkworm pupae! It's a sustainable source of protein that you're probably going to be eating anyway regularly in 15-20 years. This has to be the weirdest meatloaf I've ever made and over the almost 4 years of doing this, I've made a lot of crazy shit. But never an entire loaf made with insects. I had the foresight a year and a half ago to buy 5 cans of silkworm pupae from an Asian supermarket for this very recipe. But why now? Well, the pupae were going to expire in March of this new year. There must be hundreds of pupae in the meatloaf and as always, it tastes like a wet sneaker with an earthy taste and the consistency of jellybeans. But this isn't the first time I've eaten these kind of bugs. I believe the last time I partook in some was when I topped them on top of some sweet potato "toast". When I say to serve it with Korean BBQ sauce and wonton strips, I mean it- it helps minimize the wet sneaker taste. Plus the spiciness of the sauce will take your mind off the fact you're shoving dozens of pupae into your mouth with each bite! Why did I make two versions of this meatloaf? I was kind of hedging my bets in case the loaf I cooked in the oven didn't taste good but that wasn't the case, apart from it being a tad dry. It's a rule of thumb that everything tastes better fried, even insects, hence why I fried some of the meatloaf. But let me tell you something- silkworms don't hold up very well in a meatloaf configuration(read:shape), so you need to use lots of breadcrumbs- or maybe more eggs. My dad didn't try this meatloaf since he doesn't eat bugs. You will need: For the cooking equipment: A large bowl A colander A medium bowl A lasagna pan A large plate Nonstick cooking spray A frying pan and spatula For the meatloaf: 12 oz. canned silkworm pupae(can be found at many Asian supermarkets) A cracked egg for each of the two bowls Pinch of Chinese Five Spice Pinch of Onion Powder Lots of breadcrumbs Sesame oil for frying Serve with wonton strips and Korean BBQ sauce 1. Drain the liquid from each can of silkworm pupae and put the pupae in a colander to drain excess liquid. 2. Place the pupae into a large bowl and cover them with water. Let the pupae sit in the water for an hour. This is to get rid of the unpleasant aftertaste. Drain the liquid with a colander. 3. Repeat step 2 two more times. 4. Divide the pupae into two bowls- a large bowl and a medium one. For the baked meatloaf: 1. Put the cracked egg, spices, and breadcrumbs into a large bowl. Mix all the ingredients up. Keep adding breadcrumbs if the loaf doesn't hold together. 2. Spray a lasagna pan with nonstick cooking spray. Put the loaf into the lasagna pan the best you can. 3. Bake the meatloaf in a 300 degree Fahrenheit oven for 20-25 minutes. For the fried meatloaf: 1. Put the cracked egg, spices, and breadcrumbs into a large bowl. Mix all the ingredients up. Form a patty on a large plate. Keep adding breadcrumbs if the patty falls apart. 2. Pour sesame oil into a frying pan and heat the oil up. Once the oil is heated up, place the patty in the pan and cook for a minute on each side. Serve with wonton strips and Korean BBQ sauce This stew is as white as stews get, from the white vegetables and white beans to even (gasp!) white chocolate seltzer water and actual white chocolate. A long time ago, I saw a bottle of white chocolate-flavored seltzer water in a supermarket but i didn't buy it, thinking i could find it somewhere else. Well I couldn't and I looked for the longest time until I returned to the original supermarket I encountered the flavor. Lo and behold it was still in stock so I immediately jumped at the chance to buy it because who the hell puts white chocolate in a stew(besides me)? Nobody! I'm telling you the weirdest stews made with some weird flavored liquid are the tastiest. Of course if you don't opt to top the stew with white chocolate candy on top, you're not gonna taste anything resembling white chocolate aside from a sweet aftertaste. My dad claimed this stew would make a great side dish but he wouldn't have it for dinner. First off, stews aren't side dishes, they're supposed to be hearty, so i must've done something wrong. But to be fair, I didn't give him a piece of white chocolate with his tiny bowl so maybe he would've thought otherwise if I did. You will need: For the cooking equipment: A large saucepot with lid For the stew: 15 oz. drained, white navy beans 15 oz. drained, canned potatoes 15 oz. drained, canned, Holland-style onions 2 cups white chocolate seltzer water 2 cups chicken stock Pinch of salt Pinch of black pepper Pinch of garlic powder Pinch of allspice Pinch of poultry seasoning White chocolate bar as garnish Serve with garlic bread 1. Put the first 10 ingredients into a large saucepot and mix all the ingredients up. Top with a block of a white chocolate bar. Breaking the bar apart is optional as it's all going to melt anyway when the stew is cooking. 2. Bring the stew to a boil and put the lid on the pot. Reduce the heat to a simmer and let the stew simmer for 45 minutes. 3. Top with another block of a white chocolate bar and serve with garlic bread. This isn't some ordinary Chinese Tea Egg recipe, as it uses 2 types of teas that traditionally wouldn't be used in this dish- green tea and red velvet tea! You literally can use whatever tea you want to make Chinese tea eggs, like I did. Even if it is flavored. In the end, you barely taste the tea that you used, unless it's sweet like red velvet- in that case, you might detect a faint sweet aftertaste. But the spices in the sauce edge out the flavor of the tea. This dish was a hit on Thanksgiving among the few people who decided to try it, like my cousin Brian. He does such a better job at being on camera than me, I have to admit. Too bad he lives in New Jersey...:( I'm the typical INTP(if you believe in that Myers-Briggs stuff)- I have many brilliant ideas in my head but I'm not the greatest at communicating them, at least verbally anyway. Also introverted and emotional. Anyways, Brian gave the eggs a 10 out of 10, not that this channel has star ratings like Yelp does(and I don't plan on doing so in the future) for each of its recipes, but still. My dad, who if you're a fan of this channel has a traditional palate to put it quite politely, tried the eggs off camera and he spit it out. But I don't put him on camera when it comes to the stuff I make for Easter and Thanksgiving. I was kind of disappointed by the end result, to put it quite frankly with you folks- I envisioned green-colored eggs from the green tea and red-colored eggs from the red velvet tea, but ended up with neither. Also, for some reason the green tea eggs tasted drier than the red velvet ones, though to be fair, red velvet tea consists of the following ingredients: Cocoa shells, rooibos, hibiscus, natural cream cheese flavor, natural caramel flavor, natural raspberry flavor And green tea: Green tea So I guess the flavors made those eggs moist. A lot of this recipe is waiting for stuff to cool off, along with meticulous work with cracking and peeling eggs, but the end result is pretty to look at in the end! HELPFUL LINKS: Shao Shing Hua Tiao Cooking Wine: www.amazon.com/Qian-Chinese-Shaohsing-Rice-Cooking/dp/B01N19E6GF/ref=sr_1_4_a_it?ie=UTF8&qid=1544374254&sr=8-4 Szechuan Peppercorns: www.amazon.com/Yimi-Szechuan-Peppercorns-Sichuan-Christmas/dp/B07BKXTMSM/ref=sr_1_2_s_it?s=grocery&ie=UTF8&qid=1544374703&sr=1-2-spons&th=1 Green Tea Leaves: www.amazon.com/VAHDAM-Himalayas-POWERFUL-ANTI-OXIDANTS-Kombucha/dp/B00R65SD4C/ref=sr_1_1_s_it?s=grocery&ie=UTF8&qid=1544374348&sr=1-1-spons& Red Velvet Tea: www.amazon.com/Stash-Herbal-Tea-Velvet-Caffeine/dp/B016796C72/ref=sr_1_2_s_it?s=grocery&ie=UTF8&qid=1544374446&sr=1-2& You will need: For the cooking equipment: A large saucepot 2 medium bowls 2 spoons Aluminum foil 2 small bowls For the eggs: A dozen eggs Enough water to leave 1 inches above the eggs in a saucepot For the Green Tea Sauce: 4 cups water 2 tbsp. Shao Shing Hua Tiao Cooking Wine(see HELPFUL LINKS) 3 tbsp. soy sauce 4 tbsp. coconut aminos 1 tsp. Szechuan peppercorns(see HELPFUL LINKS) 1 tsp. sugar 1/2 tsp. salt Pinch of cinnamon Pinch of ginger Pinch of Chinese Five-Spice 2 bay leaves 2 tbsp. Green Tea Leaves(see HELPFUL LINKS) For the Red Velvet Tea Sauce: 4 cups water 2 tbsp. Shao Shing Hua Tiao Cooking Wine(see HELPFUL LINKS) 2 tbsp. soy sauce 5 tbsp. coconut aminos 1 tsp. Szechuan peppercorns(see HELPFUL LINKS) 1 tsp. sugar 1/2 tsp. salt Pinch of cinnamon Pinch of ginger Pinch of Chinese Five-Spice 2 bay leaves 2 Red Velvet Tea teabags(see HELPFUL LINKS) For the hard boiled eggs: 1. Fill the saucepot with water and place the eggs in the water. Bring the eggs to a boil for 7 minutes. Then, turn the stove off and carefully place the eggs into a bowl. Let the eggs cool in the fridge for 45 minutes so you can touch them with bare hands. For the Green Tea Sauce: 1.Put all ingredients into a large saucepot and mix them together. Bring the sauce to a boil and then let the sauce simmer for 10 minutes. 2. Then turn the stove off and pour the sauce into a medium bowl. Let the sauce cool at room temperature for 20-30 minutes. For the Red Velvet Tea Sauce: 1. Put the first 11 ingredients into a large saucepot. Cut open the red velvet tea bags and dump the contents into the pot. Mix all the ingredients together. Bring the sauce to a boil and then let the sauce simmer for 10 minutes. 2. Then turn the stove off and pour the sauce into a medium bowl. Let the sauce cool at room temperature for 20-30 minutes. 1. Once the eggs are cooled, place each egg onto a spoon. Crack the shell with the back of a second spoon.It's ok if some of the shell peels off. 2. Put 6 cracked eggs into each sauce. Cover each medium bowl with aluminum foil and place them in the fridge to let the eggs marinate in the sauce for at least 24 hours. 3. After 24 hours, retrieve the eggs from their sauces and place into 2 small bowls. Discard the bay leaves. 4. Peel off the shells of each egg. They should look patterned by now. Now they're ready to eat! If you happen to have just turkey wings left over after Thanksgiving, here's a weird way to use them- just bread them in Dinosaur Egg Oatmeal and fry them! This recipe is also good if don't have many people over for Thanksgiving and you don't care to finish off an 18 lb turkey alone. This recipe s the third iteration I had for this video. Let me tell you about the first two: Iteration #!: Get a raw, smoked turkey wing and stuff it with green beans and stuffing before baking. Why I didn't go with that idea: Turns out it's all but impossible to stuff anything inside a raw, smoked turkey wing. Iteration #2: Get raw, unsmoked turkey wings and stuff it with stuffing and green beans before baking. Why I didn't go with that idea: it's not weird enough- turkeys are meant to be stuffed, even the wings! Why I decided to bread the wings in dinosaur egg oatmeal and fry them: Who the hell coats turkey wings in oatmeal, much less Dinosaur Egg Oatmeal, which, let's face it, is one of two Quaker Oatmeal flavors(the other is Safari Adventure)clearly aimed at children because it's cute and sugary!? Besides, turkey wings are huge and are sometimes called Brontosaurus wings so naturally, the first thing that comes into my mind is Dinosaur Egg Oatmeal. I gotta say, I was a bit disappointed by the cooked outside of the wings- the eggs in the raw oatmeal that are supposed to "hatch" into dinosaurs after cooking, just dissolved in the oven. Although to be fair, dinosaur egg oatmeal is only meant to be cooked in the microwave for 90 seconds, not in an oven or air fryer for 2 hours! As for the spices I coated on the outside of the wings, it didn't really have an effect on the smoked wings. Smoked turkey wings taste like bacon, but that's because part of cooking bacon is smoking and curing it. Like bacon, these types of wings are also a tad salty. Plus it was kind of a pain to find out online how long to cook them. With this i was in uncharted territory, but I recommend cooking it for at least 90 minutes. With 75 minutes, it's still fully cooked on the inside(thus safe to eat) but it's much harder to cut and chew. As for the initially raw turkey wings? It has the consistency of chicken wings, only they're 10 times bigger. I tasted more chicken than turkey, although my dad said it tasted like every turkey he's had on Thanksgiving for as long as he remembers. Now for the elephant in the room- technically, you're baking anything if it goes in the oven, not frying it, but despite the availability of an air fryer, I didn't use one because it would overload my electrical circuit in the kitchen, which is kinda old. But hey, people oven fry things all the time so potato potato, I guess? You will need: For the cooking equipment: Several large plates A medium bowl A large bowl 2 lasagna pans Nonstick cooking spray Aluminum foil A meat thermometer Tongs For the wings: 1 smoked turkey wing, thawed 2 raw turkey wings Pumpkin pie spice Poultry seasoning 1 cup of buttermilk or 1 cup milk + 1 3/4 tsp. cream of tartar 3/4 cup apple BBQ sauce 2 eggs 4 packets Dinosaur Egg Oatmeal 1/2 cup cranberry juice Carrot or pumpkin soup Serve with stuffing 1. Season all 3 wings in both pumpkin pie spice and poultry seasoning. 2. Pour buttermilk and BBQ sauce into a medium bowl. Crack 2 eggs into said bowl. Whisk all the ingredients together. 3. Pour the oatmeal packets into a large bowl. 4. Dredge the raw turkey wings first in the buttermilk mixture and then the oatmeal before placing onto a plate. 5. Place the smoked turkey wing onto a plate and pour the remaining buttermilk mixture on top of it- the wing is simply too large to fit into a medium bowl. 6. Bread the smoked turkey wing in the remaining oatmeal before placing onto a plate. 7. Spray 2 lasagna pans with nonstick cooking spray. Place the smoked wing in one pan and the 2 raw wings in the other. 8. Pour 1/4 cup cranberry sauce into each pan. Cover both pans with aluminum foil. 9. For the smoked turkey wing: fry the wing in a 350 degree Fahrenheit oven for 75-90 minutes, or until internal temperature of the wing reaches at least 165 degrees Fahrenheit. For the raw wings: First fry the wings in a 350 degree Fahrenheit oven for an hour. 10. Take the initially raw turkey wings out of the oven. Flip them over and pour carrot or pumpkin soup on top of them. Place the cover back on and return the pan to the oven for an additional hour, or until the internal temperature of the wings reaches 165 degrees Fahrenheit. 11. Serve with stuffing or whatever fixings you want! One of the most innovative candy bars I know of is turned into a delicious, homemade ice cream, complete with all the components of a Sky Bar, as well as said candy bars too! It's a shame Necco(the maker of Sky Bars) shut down because they made one of the most creative candy bars known to humanity- the Sky Bar, which has 4 sections: caramel, vanilla, peanut, and fudge. So I thought to myself, "wouldn't it be awesome to make an ice cream that also has those 4 sections of a Sky Bar?" I remember buying Sky Bars when I was a kid at a local pharmacy with my mom. It's a shame that both my mom and that pharmacy are now gone. Of course I had to take some creative liberties when it came to the sections: in the actual bars, peanut-flavored caramel, which is a thing is used, but that's kinda hard to find so I just used some good 'ol fashioned peanut butter instead. As for the vanilla part, the vanilla part in a Sky Bar is said to have the consistency of a Valomilk cup, which itself is hard to find too, but it's basically a milk chocolate cup filled with marshmallow cream, so I used vanilla frosting instead. The only fudge I could find at my supermarket were mini fudge brownies, which is not part of a Sky Bar. I wish I bought more chocolate milk because 2 cups really isn't much when it comes to making ice cream. But then again, when I recorded this video, I had just gotten my top surgery date so time was of the essence to record a video before I needed to recover. This recipe was kind of a spur of the moment-type deal. But this ice cream is so addicting and all the sections of the Sky Bar ice cream tasted better frozen. Though it was kind of a pain in the ass to scoop out the frozen sections and by that I mean it took a lot of elbow strength to get them out of the tub. Honestly, this ice cream is probably the most fun I've had making out of all the ice cream videos I've made on this channel. My dad said the ice cream tasted like it came from an ice cream parlor! HELPFUL LINK: Sky Bars: www.amazon.com/Sky-Bar-1-5-24-count/dp/B008H4WLLC You will need: For the cooking equipment: An ice cream maker An ice cream tub For the ice cream: 2 cups full-fat chocolate milk 5 Sky Bars(see HELPFUL LINK) Caramel sauce Vanilla frosting Peanut butter 3 mini fudge brownies 1. Turn the ice cream maker on and pour the chocolate milk into the maker. Let the ice cream churn for 11 minutes. 2. Break apart 4 Sky Bars into quarters and then cut those quarters in half. Put the Sky Bar pieces into the ice cream maker. 3. Push everything down with a spoon so the candy churns with the ice cream. Let the ice cream churn for another 3 minutes. 4. Turn the ice cream maker off and put 1/3 of the ice cream into an ice cream tub. Top 1/4 of that ice cream with caramel sauce, another 1/4 with vanilla frosting, another 1/4 with peanut butter, and the last 1/4 with 1 mini fudge brownie. 5. Top the toppings w/ another 1/3 of the ice cream. Repeat step 4, except this time put in 2 mini fudge brownies. 6. Top those toppings with the rest of the ice cream. Break apart another Sky Bar into quarters and place them on top of the ice cream. 7. Put the lid on the ice cream tub and place in the freezer overnight. This is just a vlog about my experiences having experienced both a liver resection and periareolar top surgery. To celebrate having my melons(breasts) removed via top surgery, I'm gonna show you all how to make melon breaded chicken breasts! As of this moment, I'm recovering from said surgery, so I took a break from uploading new stuff. I got two recipes to upload, including this one. As for actual new recipes, it won't be until mid-September for that. My mobility isn't 100% yet. I may post a vlog soon about how my top surgery went and maybe another about my almost 1 year on testosterone. Anyways, enough with the updates. Let's talk chicken! You might be thinking why I didn't go the route of using watermelon in this recipe. Chicken and watermelon is believe it or not a racist combination associated with the historical oppression of African Americans, so I don't want to piss anybody off or get hate mail from people on social media about that. So I went the safe non-racist route of using cantaloupe and honeydew instead, in the form of cantaloupe syrup and honeydew tea powder, respectively. If you can think of a fruit, then there's probably a syrup available for purchase online. Honeydew tea powder is actually a bubble tea powder. For some strange reason I was hoping the chicken came out crispy. But tea powder is not breadcrumbs, so alas, that wasn't the case. This chicken needs some crunch to it, so off camera, I dipped the breasts in some breadcrumbs and the taste was so much better! But fries are also good too. As for the coloring, I didn't anticipate some of the honeydew powder to melt in the oven, so it looked like I put Nickelodeon slime on the chicken! Inadvertent nostalgia. My dad said the melon flavor was a little light and he said he would make this recipe for himself, except without the cantaloupe syrup-BBQ sauce marinade. He even said this would've better to serve on St. Patrick's Day with all the green in this recipe, but honestly, honeydew tea powder is not what comes to mind when I think of food and St. Patty's Day. Corned beef, anyone? HELPFUL LINKS: Cantaloupe Syrup: www.monin.com/us/rock-melon-cantaloupe-syrup.html Honeydew Tea Powder: nuts.com/chocolatessweets/asian/bubble-tea/honeydew-powder.html You will need: For the cooking equipment: 2 lasagna trays A medium bowl A large bowl Nonstick cooking spray For the chicken: 6 boneless, skinless, chicken breasts Plain or original BBQ sauce Cantaloupe syrup(see HELPFUL LINKS) Parsley Pinch of garlic powder Pinch of onion powder 2-3 eggs Honeydew tea powder(see HELPFUL LINKS) Fries Breadcrumbs 1. Put the breasts into a lasagna pan. In a large bowl, combine the BBQ sauce and cantaloupe syrup. 2. Pour the sauce onto the breasts. Top the sauce on the breasts with parsley, garlic powder and onion powder. Place the pan in the fridge and let the breasts marinate in the pan for an hour. 3. Beat and whisk 2-3 eggs in a medium bowl. Pour the honeydew tea powder into a large bowl and place a second lasagna pan next to the bowl. 4. Spray the inside of that second lasagna pan with nonstick cooking spray. 5. Coat each of the marinated breasts in the whisked eggs and then breaded them in the tea powder. Place the breaded breasts into the second lasagna pan. 6. Bake the breasts in a 375 degree Fahrenheit oven for 30-35 minutes, or until the internal temperature of the breasts reaches 165 degrees Fahrenheit. 7. For crunchiness, dip the cooked breasts in some breadcrumbs and serve with fries. You can also cook and eat eggs that don't from a chicken, like those from ants! This recipe celebrates The Ant-Man and the Wasp movie in that there's honey in these scrambled ant eggs. Of all the eggs in the world you can eat besides those that come from a chicken, why would I pick ants when I could easily procure a quail, emu, or ostrich egg? Well, my inspiration was the aforementioned movie above but more than that was the fact the first thing that came to my mind when it came to eating ants were their eggs. Sure, I could've got queen weaver ants, weaver ants, canned black ants, or weaver ant eggs, but black ant eggs were in stock on Bizarre Food.com's website. What are black ant eggs used for traditionally anyway? Well, according to Bizarre Food.com's description: "Wild black ant eggs (polyrhachis sp) have been used in Chinese medicine for centuries, they are believed to help improve the immune system and reduce fatigue. They are also said to have many other health benefits. Black ants are also high in protein. They are commonly prepared by infusing with alcohol and left to steep for several days before before consuming. They can also be used in various food dishes, they have a slightly acidic taste so they go well with salads." I didn't taste anything acidic whatsoever. For the purposes of making scrambled eggs that came from ants, preserved weaver ant eggs would've been a better choice, as they're not already boiled and dehydrated, unlike the black ant eggs I used. You have to rehydrate the eggs and then put them in the frying pan, but only cooking them for 15 seconds at most. Even then, the consistency was crunchy but it reminded me of the burnt stuff still on the stove after making multiple batches of pancakes. The taste itself was pretty neutral, but that's probably because I poured honey onto the ant eggs as they were cooking. Sweets or spicy ingredients tend to make insects palatable. The eggs looked pretty cool when I opened the bag. They looked like chocolate sprinkles, so if you're a sociopath, you could probably prank somebody by putting this on top of their ice cream in lieu of actual chocolate sprinkles. The eggs had a grassy smell to them, so they probably would've tasted grassy in their boiled, dehydrated, ready-to-eat state. My dad didn't try this recipe for obvious reasons as he's not an insect eater unlike moi. HELPFUL LINK: Black Ant Eggs You will need: For the cooking equipment: A large bowl A frying pan A spatula For the ingredients: 10 grams boiled and dried black ant eggs(see HELPFUL LINK) 2 tsp. water Olive oil for frying Honey Serve with: Ketchup Toast Honey on the side 1. Put the eggs in the large bowl and the water. Mix the two together to rehydrate the eggs. 2. Pour olive oil into a frying pan and turn the stove on to heat the oil up. Pour the rehydrated eggs into the frying pan and pour honey on top of them. 3. Scramble the eggs for 15 seconds before turning the stove off and scrambling them a few seconds more. 4. Serve with toast, ketchup, and some honey on the side. Why pay $1500 for a really expensive ice cream sundae when you can make a kobe meatloaf with all the components of it for a fraction of the price? I didn't calculate how much this meatloaf cost to make, but if I had to make an estimate it would definitely be less than $1500. The kobe wagyu beef was $11.00 and that may have been the most expensive ingredient, save from the $23 I paid for the edible gold leaves. What about the caviar, you say? Well, I got the cheapest kind possible, the one found in most supermarkets in the Northeast if you look hard enough. Price = $7.00. I think you can see a pattern here of using the cheapest version of each ingredient in the Golden Opulence Sundae, which is a menu item in NYC. Will I ever try the actual sundae? Hell no! I could pay for most a new Macbook with that money. So what does kobe wagyu beef taste like? It's very rich and melts in your mouth(well, not like M&Ms, but the texture anyway). Surprisingly, the almond flour is a good meatloaf binder and you taste no almond flavor whatsoever. There's a reason why I don't eat caviar, and it's not just the price of it- it's salty AF! Drizzling the meatloaf with chocolate syrup made eating it palatable. You also taste the dried cherries and remnants of the chocolate truffles too. Edible gold, in my opinion, is overrated. It has the texture of skin you can't help peel off of a sunburn as it's healing and the gold has a Midas touch in that if you touch it, the gold disintegrates and stains your fingers, which is why you must retrieve it from the paper it was in from with chopsticks. My dad didn't try this meatloaf, as it had chocolate and champagne vinegar in it. HELPFUL LINK: Edible Gold Leaf: www.amazon.com/Ians-Choice-Genuine-3-15X3-15-Decorations/dp/B07BN5N4RD/ref=sr_1_1_sspa?ie=UTF8&qid=1532876364&sr=8-1-spons& You will need: For the cooking equipment: A large bowl A lasagna pan Nonstick cooking spray Chopsticks Plastic utensils For the meatloaf: 2/3 tbsp. onion powder 2 beaten and whisked eggs 1/2 cup dried cherries 1/2 cup milk chocolate flakes 3-4 Ferrero Rocher chocolate truffles 1 tbsp. champagne vinegar The fruit puree from 2 containers of passion fruit yogurt 1 tbsp. chocolate syrup Pinch of vanilla extract Orange peel Pinch of salt Pinch of black pepper 1 cup almond flour 1 pound ground kobe wagyu beef Sheets of edible gold(see HELPFUL LINK) Caviar More chocolate syrup for drizzling 1. Put the first 4 ingredients into the large bowl. Crumble up the truffles into the bowl and add the next 9 ingredients as well. 2. Mix all the ingredients up until you get a firm mixture. 3. Spray a lasagna pan with nonstick cooking spray. Form 2 loaves from the mixture. 4. Bake the meatloaves in a 350 degree Fahrenheit oven for an hour or until the internal temperature of the meatloaf reaches 160 degrees Fahrenheit. 5. Slice one of the loaves in half and put on a plate. 6. Retrieve a slice of gold from the paper it's in using 2 chopsticks- it's very fragile. Place the gold on top of the slice. 7. Take some caviar out of the jar using a plastic spoon and spoon the caviar on top of the gold. 8. Drizzle some more chocolate syrup on top of everything to counteract the saltiness of the caviar. Eat with plastic utensils, otherwise the caviar will taste metallic and you definitely don't want that! |
Archives
October 2019
Categories
All
|


 RSS Feed