|
I may have been cooking for more than a year now but when it comes to hot oil and frying stuff, I'm scared to use a deep-fryer or putting a ton of oil into a saucepan and heating that oil. Yet I've always wanted to know what a deep-fried candy bar tasted like. This is obviously not deep-fried candy bars, but this is the closest thing to it I can get without having to buy a deep-fryer- a good ole' frying pan. Since there's a lot of more oil in a deep-fryer than a frying pan(which tends to be shallow), pan-frying food is slightly healthier than deep-frying it. But make no mistake: this recipe is not diet food! It's junk food with a lot less oil and grease. It turns out even after freezing the candy bars for 2 hours, they still melt quickly in the frying pan, which is why you can't cook it for more than 30 seconds on each side. If you look at the picture on the left and in the video, the only bar that held its original shape and form was the 3 Musketeers Bars, which has no nuts in it, unlike the Almond Joy bars and Snickers bar I used. I don't know if the inclusion of the nuts in the bars caused it to melt. Unlike most of my recipes, I bought the main ingredient for the dish(the candy bars) from a Rite Aid. In my odyssey to find the bars I wanted to use, I had my hopes on obtaining a 100 Grand bar, which didn't happen, but if the inclusion of nuts has anything to do with it, a 100 Grand bar probably would've melted as well in a frying pan. So I used a Rocky Road Snickers bar instead(the Rocky Road flavor is a limited edition flavor but any conventional Snickers bar will do for this recipe). This is a culinary experiment after all, considering that nobody on the Internet has tried pan-frying candy bars before, which is why the inspiration for this recipe(http://www.foodnetwork.com/recipes/deep-fried-candy-bars-recipe2.html) uses deep-frying, not pan frying. Based on my previous pan-frying experiences with other foods, if you're not making pancakes, I advise you to coat your desired food that you wanted to pan-fry in breadcrumbs. But I recommend you use unseasoned breadcrumbs(not panko breadcrumbs- those are too thick for candy bars) in this recipe because using the seasoned breadcrumbs you get from the supermarket(which typically use garlic, basil, and black pepper) would interfere with the taste of the fried candy bars. I mixed my unseasoned breadcrumbs with a tablespoon of cocoa powder since the bars are chocolate bars after all. When I told my dad I was having the fried Almond Joy bars & fried Snickers bar for dinner, he said I was joking, so he advised me to have a glass of milk with these fried bars. Milk actually goes great with fried candy bars. As for the taste of the fried candy bars, I tasted warm candy bars that literally melted in my mouth, combined with the crunchiness of the breadcrumbs. It may be only February but the idea of fried candy bars and milk would appeal to Santa Claus(if he was real). You will need: For the cooking equipment: Wax paper 2 large plates A medium bowl A large bowl A frying pan Tongs 2 forks For the bars: 4 candy bars(I used one 3 Musketeers bar, 1 Snickers bar, and 2 Almond Joy bars that come in one package) All-purpose flour 1 tsp. of baking powder Pinch of salt 1 egg 1 tbsp. of canola oil 1 cup of milk 1 tbsp. of cocoa powder Unseasoned breadcrumbs More canola oil for frying A glass of milk to have with the bars 1. Wrap each bar in wax paper and put them in the freezer for 2 hours to better improve the odds that most of them will hold their shape during the battering and frying process. 2. After 2 hours, unwrap the bars from the plastic wrap. 3. Put the all-purpose flour, salt, and baking powder on a large plate. Mix all of those dry ingredients together. 4. In a large bowl, crack one egg. Then add canola oil and milk. Mix all of those wet ingredients together. 5. In a medium bowl, mix unseasoned breadcrumbs and cocoa powder together until you get a breading that is light-to-medium brown in color. 6. Dredge each bar in the flour mixture and then the milk mixture. After that, coat the bars in the breadcrumb mixture. Use tongs so you won't get your hands messy. 7. Heat oil in a frying pan. Once the oil is heated up, put the battered and breaded bars into the frying pan, let them fry for 15-30 seconds on the bottom. 8. After 15-30 seconds, flip the bars over using two forks. Let the bars fry again for 15-30 seconds. During this frying process, make sure the bars don't melt too much. 9. After that, quickly remove the bars from the frying pan and put on a large plate. 10. Serve with a glass of milk. Bon appetit!
1 Comment
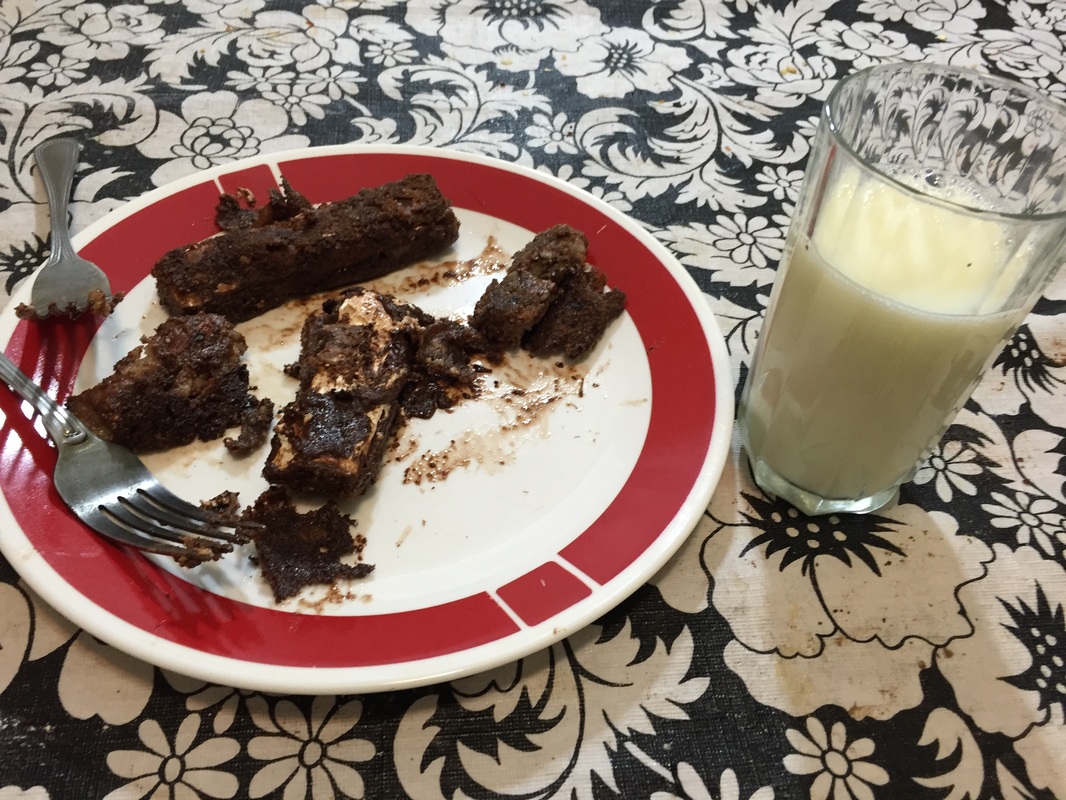
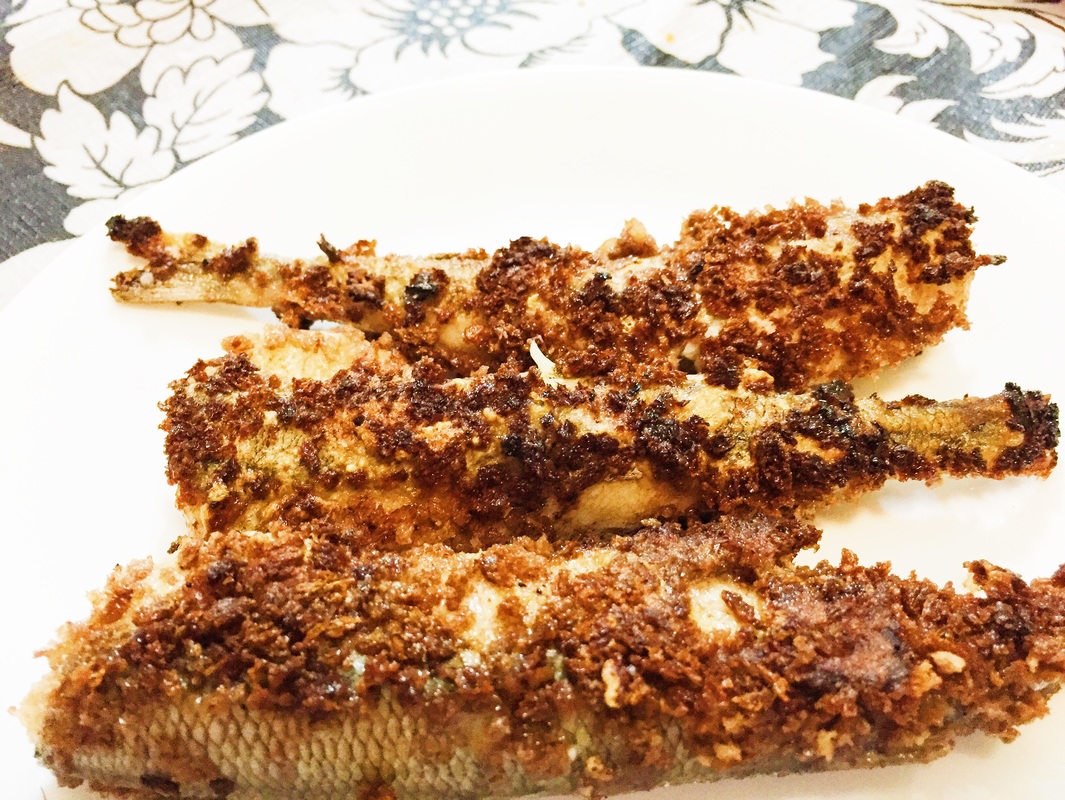
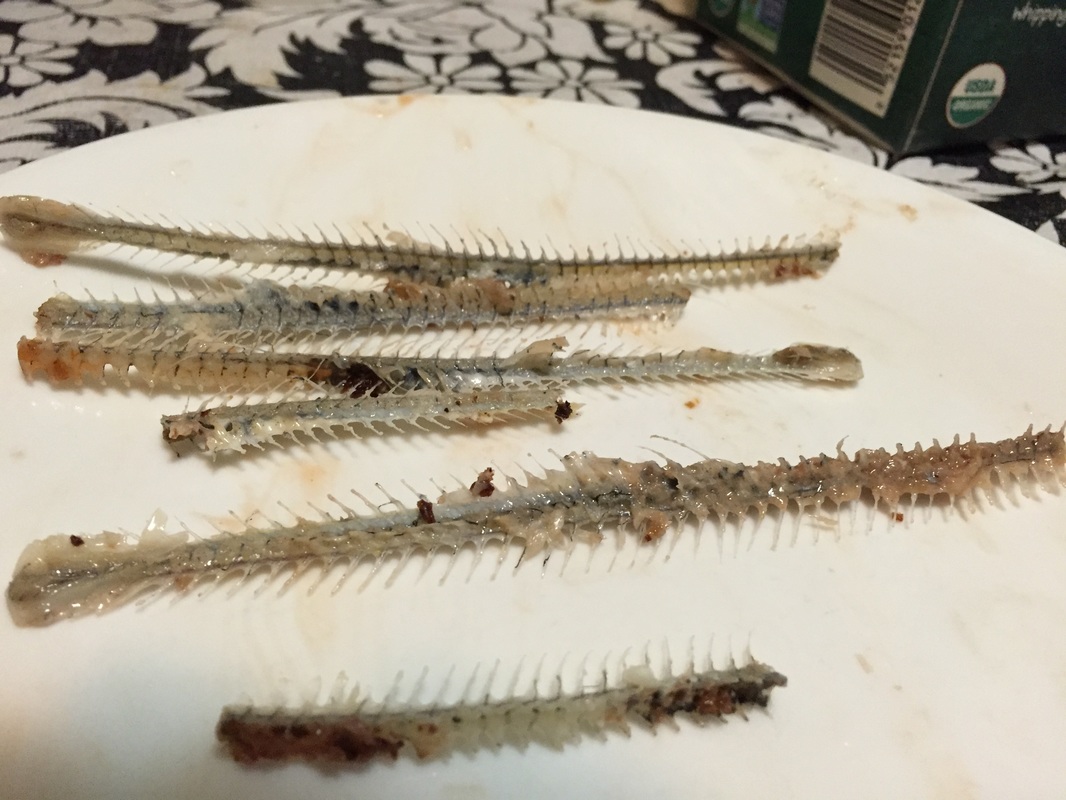
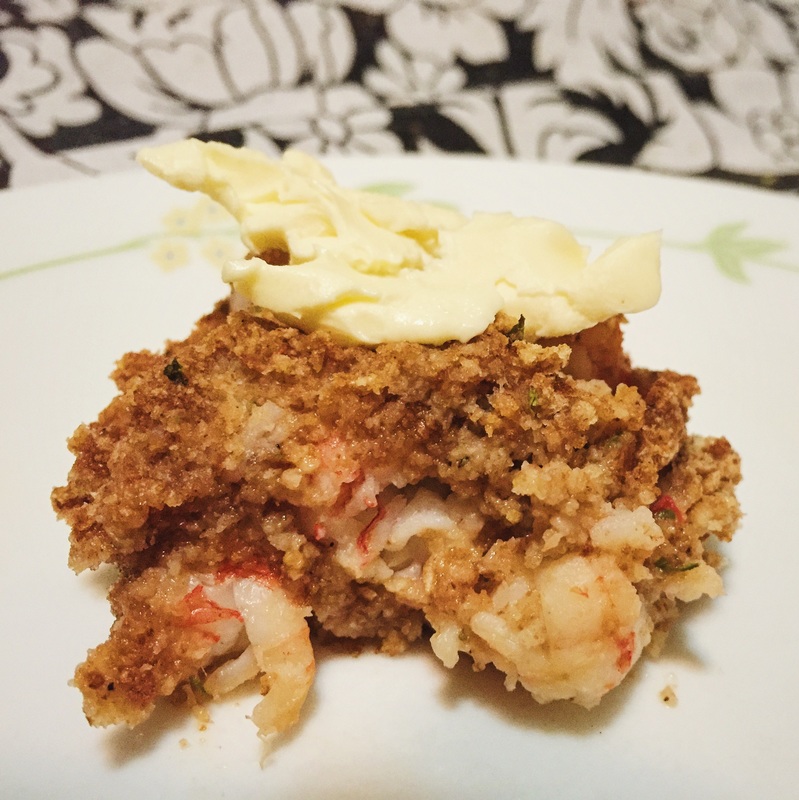
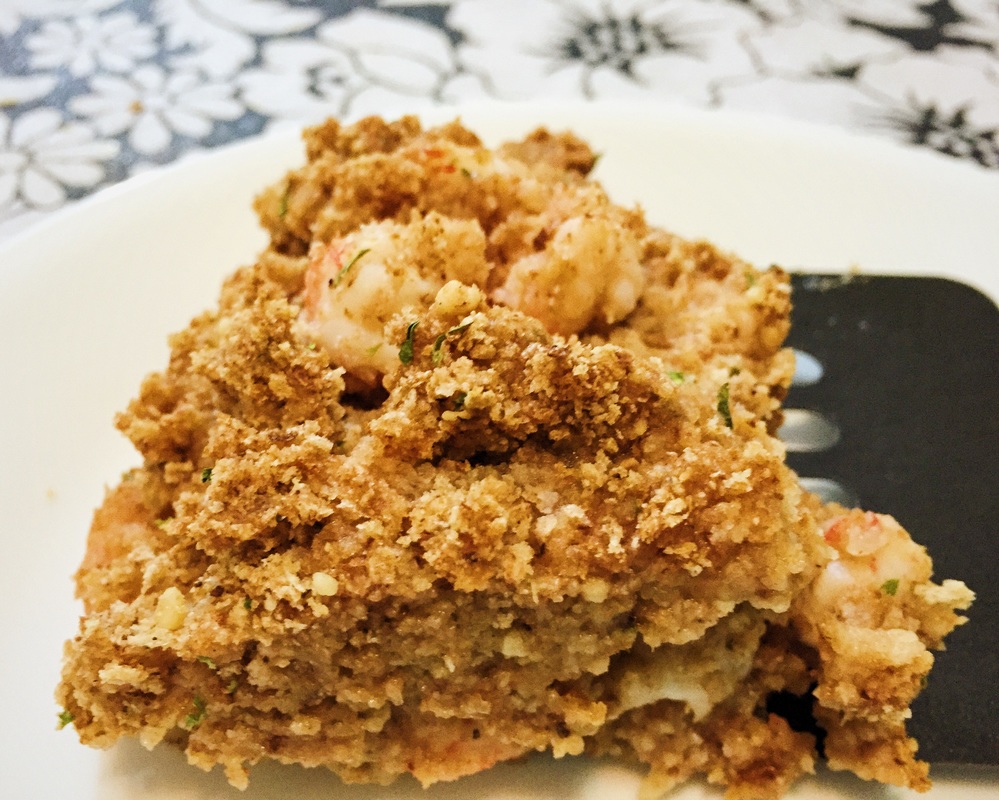
Why is it always when I write a really good blog post, my computer restarts due to overheating and erases the blog post completely, forcing me to do it over again!? Let me start this before my computer goes haywire again: Over the years, I have seen many limited edition flavors of Pepperidge Farm bread at my local supermarket: strawberry bread, caramel apple bread, blueberry bread, banana bread, French toast bread, even chocolate chip bread. But never chocolate bread! So I decided to show you how to make your own chocolate bread. It's quick because instead of yeast, it uses baking powder and baking soda to rise and bake the dough. My inspiration for this recipe is from http://www.tasteofhome.com/recipes/chocolate-quick-bread. I didn't realize this recipe was rated two stars(out of five), but that was based off of one review that's 5 years old. The reviewer said the bread was too dry and crumbled easily. Also, I didn't use pecans in the bread because i wanted the bread to be a bona fide chocolate bread. I sort of agree with this reviewer, however, I'm looking at the bright side of things. The bread wasn't too dry and it's nothing your favorite jam, jelly, butter, or spread can't fix. As for the crumbly bread, it crumbled easily but that makes my job easier when it comes to making the chocolate breadcrumbs for my upcoming chocolate mole chicken meatloaf video. 45 minutes into the cooking process, I could smell something like chocolate chip cookies throughout my home. I liked the bread. It had the texture of cake and the melted dark chocolate chips reminded me of lava cake. This is the first time I used buttermilk in this recipe. I learned my lesson from my chocolate cream pie debacle last Christmas(I used butter and milk instead of heavy whipping cream and all I got was a pudding inside a pie crust) to follow the recipe when it comes to dairy ingredients. You will need: For the cooking equipment: A large bowl A medium bowl A loaf pan Nonstick cooking spray A baking tray For the bread: 1 3/4 cups of all-purpose flour 1/2 cup of cocoa powder 1 tsp. of baking soda 1 tsp. of baking powder 1 tsp. of salt 1 cup of granulated sugar 1/2 cup of softened butter 2 eggs 1 cup of buttermilk 1/2 cup of dark chocolate chips 1. Put the first 5 ingredients into a large bowl. Mix all the ingredients together until well-combined. 2. Put the butter and sugar into a medium bowl and cream the two together. 3. Beat 1 egg at a time and put the insides of the egg into the medium bowl. Mix the egg into the butter-sugar mixture. Repeat this process for the second egg. 4. Add the buttermilk to the contents of the medium bowl and mix everything together until well-combined. 5. Pour the butter mixture into the flour mixture. Mix everything together until you get a dough that is not too liquidy but not too hard either. 6. Fold the dark chocolate chips into the dough. 7. Spray a loaf pan with nonstick cooking spray. 8. Pour the dough into the loaf pan. 9. Put the loaf pan on a baking tray and bake in a 350 degree Fahrenheit oven for 55-60 minutes, or until the dough is fully cooked(see the note about poking the loaf with a fork to test for doneness). 10. Take the loaf out of the oven when it is done baking. Let the loaf cool down at room temperature for 10 minutes. 11. Top with jam, jelly, butter, or spread. Alternatively, you can eat the bread as is. Bon appetit! Note: Poke a fork through the loaf to see if it is done. If the fork comes out clean, it's done baking. Otherwise, the bread can use a few more minutes in the oven. 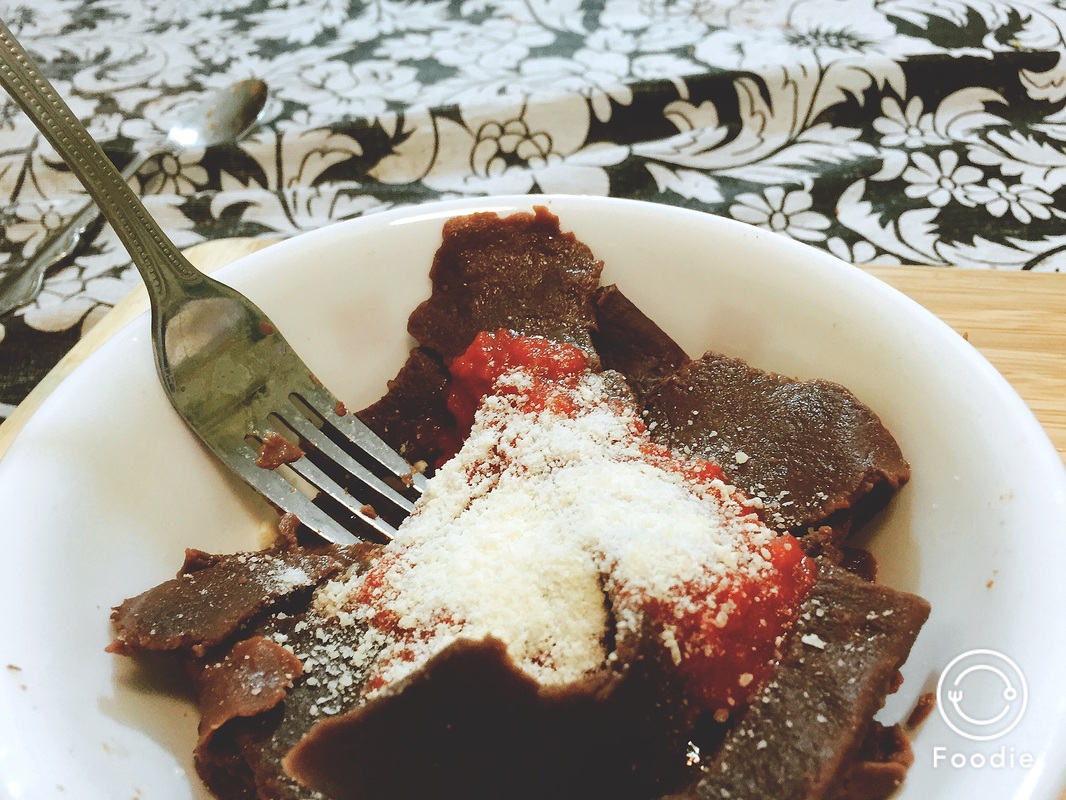 Here's my train of thought when it comes to the chocolate theme this month on Meatloaf Princess: it makes no sense to make a video for you on how to make chocolate cereal(hello, Cocoa Puffs), chocolate ice cream, chocolate sorbet, chocolate Pop Tarts, chocolate waffles, or even chocolate pasta because these recipes have either been done over and over by countless people and/or are easily found in most supermarkets. But you may be asking, "I can't find chocolate pasta at my [insert name of local supermarket]". It turns out there's a company that sells chocolate pasta on the Internet(yet strangely enough, I can't find any frog meat other than frog legs available for purchase on the Internet. I mean, come on! Imagine only being able to buy chicken wings and no other cuts of chicken. The world will be a sad place if that ever happens...), except this company(http://www.pappardellespasta.com/products/dried-pasta/flat-cut-pasta/dark-chocolate-linguine) sells chocolate pasta for $8.00 a pound! That's a bit pricey in my book when you conventional pasta will only set you back two or three dollars for one box. So I decided to make my own chocolate pasta, which is uglier than the chocolate pasta available for sale. Sorry, that's the truth. I don't have a pasta maker and I'm contemplating on getting one after making this recipe, however, I only make fresh pasta on this channel every six months on average, so such a purchase is not high on my wish list at the moment. Have you ever followed a recipe and it didn't turn out the way you hoped? The chocolate pasta recipe I found(http://www.instructables.com/id/Chocolate-Pasta-Pasta-di-Cacao/) didn't include water in their recipe, and without water, I got a mixture in the food processor that resembled a crumbled up cake. Now don't get me wrong, cake is good, but come on, people! Chocolate cake has been done countless times and besides, cake isn't a good nutritious menu option for dinner. I'm assuming the Instructables recipe didn't include water because they made pasta the traditional way- by making a well out of flour and putting the eggs in the "well", and then mixing egg and flour from the inside of the well to the outside. That well-making is time-consuming and a pain in the rear to do. A food processor may be a pain in the behind to clean but it gets the job done when it comes to making pasta dough. When the dough was done processing, it was really hard to knead and when pasta dough is hard to knead, it usually means the dough is done forming a cohesive ball. I barely had to any kneading at all! When the dough was done resting for 30 minutes, it was really hard to break into smaller dough balls, which made me think I did something wrong in this recipe. Maybe I should've used more water when making the dough. No matter how much I flattened the smaller dough balls using a rolling pin, I still got really thick pasta and not linguine. When you make this recipe, don't expect the pasta noodles to be sweet- there's no sugar in the noodles! This is a savory chocolate pasta recipe. The chocolate pasta tasted quite bitter without tomato sauce, Parmesan cheese, and garlic bread on the side. I made 18 ounces of pasta but I was the only one eating it over the span of three days. Eventually I got tired of the bitter chocolate pasta and I threw the amount that could fit one bowl into the trash. My dad couldn't share the pasta with me because unlike me, chocolate in any form keeps him up at night if he consumes it after 3 PM. At least my grandma got to try the pasta before she went to the hospital last Tuesday. Sadly this recipe will probably be the last of mine she gets to try, as she can no longer use the stairs that lead to her (former) basement apartment. I should make a sweet chocolate pasta recipe in the future though. But in the present, here's the recipe: You will need: For the equipment: A food processor A rolling pin A knife Plastic wrap A large bowl A large saucepan For the pasta: 2 1/4 cups of all-purpose flour 3/4 cups of cocoa powder 3 eggs 1/4 cup of water 1. Put the flour and cocoa powder into the bowl of a food processor. Pulse a few times. 2. Beat 3 eggs into a small bowl. Do not whisk the eggs! Just crack them into a bowl. 3. Put the eggs into the food processor. Process for 30-60 seconds. 4. Add the water into the food processor. Process for another 30-60 seconds or until a cohesive dough forms. 5. Put some flour onto a surface. Knead the dough until the dough is no longer sticky. Because you're using a food processor, you won't need to knead it very long. Stop kneading it when it's really difficult to knead the dough ball without hurting your hands. 6. Wrap the dough ball in plastic wrap and let it sit either on the counter or in a large bowl for 30-60 minutes. 7. Put more flour onto a surface. Unwrap the dough ball from the plastic wrap and either using your hands or a knife, cut the dough ball into 4-5 smaller dough balls. 8. Flatten each smaller dough ball using a rolling pin. Ideally, the dough should be no more than half an inch thick. 9. Cut the flattened dough into noodles. Place the noodles along the rim of a large bowl so they don't dry out. 10. Boil water in a large saucepan. 11. Add 1 tsp. of salt to the water before putting the pasta into the boiling water. Watch out for splashing boiling water as you're putting the pasta into the saucepan! 12. Once you put the pasta into the boiling water, let it cook for 3-5 minutes. The way you can tell it is done is to try it: you retrieve a noodle from the saucepan, run it under cold water, and taste it. 13. The pasta on its own will be bitter so it's highly recommended to top it with your favorite tomato sauce and Parmesan cheese. A serving of garlic bread on the side is optional. 14. Bon appetit! 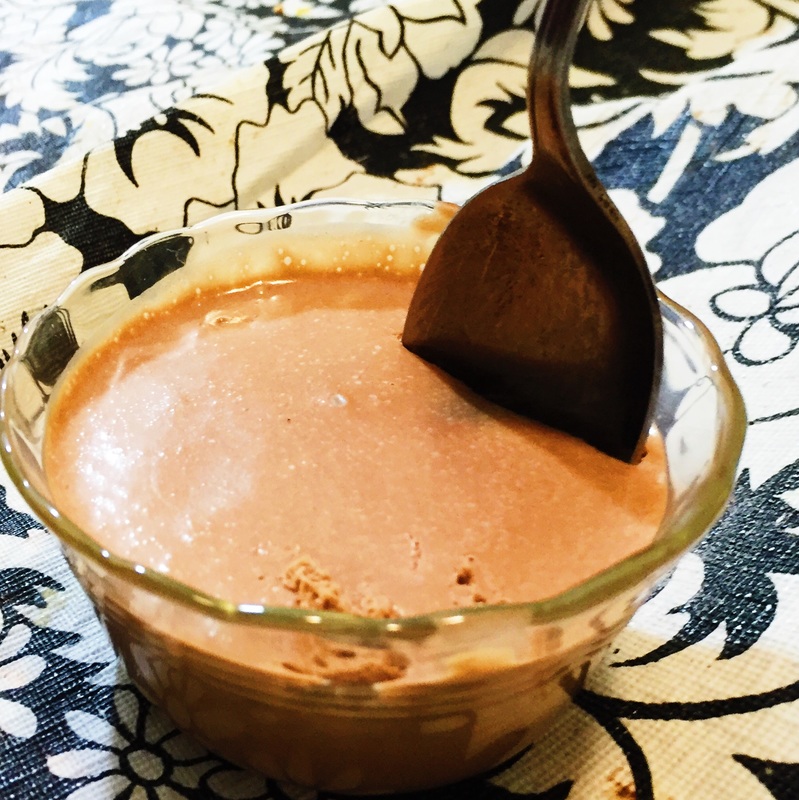 Before I say anything about this recipe, I have to give a shoutout to http://allrecipes.com/recipe/229383/barbaras-chocolate-jello/ for being the inspiration for this video. That link taught me to teach you(if that makes any sense) how to make chocolate gelatin, which according to Jell-O's Wikipedia page, was discontinued as a Jell-O flavor in 1927 and brought back briefly in stores in 1936. I looked on YouTube and there was only one other video that said in the title "Chocolate Gelatin", so I was thinking that there was reason nobody is posting chocolate gelatin videos like crazy on YouTube- maybe because it's too hard. It was actually very easy to make this gelatin and when I make a type of recipe that is really delicious, I think to myself, "How can I replicate said recipe in other flavors or ways?" That question was pretty much the impetus to start my YouTube channel in the first place. My dad even liked this gelatin recipe. In fact, at this moment I'm trying to get him to actually eat an small bowl worth of this yummy goodness(because chocolate keeps him up at night, unlike moi). This is the first time I have used unflavored gelatin in any cooking and the texture of it to me feels like sand. When I saw that unflavored gelatin is only sold in 1-ounce units at my local supermarket, I thought I needed a lot, like 4 boxes worth of the stuff. But you only need three gelatin packets(there are 4 that usually come in a 1-ounce unit). I needed to make a last minute grocery trip for obtaining the key ingredients for this recipe, except for the evaporated milk, which I had leftover from my rainbow fudge recipe last summer(don't worry it didn't expire). After making a disastrous chocolate cream pie last Christmas when I used a mixture of milk and butter in place of heavy whipping cream- the end result was a liquidy pool of chocolate pudding inside a chocolate crust- still delicious but not chocolate cream pie. You will need: For the cooking equipment: A small saucepan A blender 5-6 small bowls or whatever gelatin molds you have For the gelatin: 1/2 cup of water 3 packets(or tbsp.) of unflavored gelatin 1 cup of evaporated milk 3/4 cups of heavy whipping cream 1 cup of sweetened condensed milk 3 tbsp. of cocoa powder 1. Place the water in a small saucepan. Sprinkle the water with the gelatin all across the surface of the water. Don't dump the gelatin into the water! 2. Only stir the water and gelatin once in this step. You need to let it do its thing. Let the gelatin-water mixture sit at room temperature for 5 minutes to let the gelatin soften. 3. Put the stove on low heat. 4. Stir the gelatin into the water and make sure it fully dissolves. You also don't want any gelatin lumps left either. 5. When the gelatin has dissolved, shut the stove off. 6. Put the last 4 ingredients into a blender and blend on a low setting until the mixture is nice and smooth. 7. Pour the water-gelatin liquid into the blender. Pulse the contents in blender until well combined. 8. Pour gelatin mixture into 5-6 small bowls or whatever gelatin mold you have. 9. Put the gelatin mixture in the fridge for at least 60-90 minutes to let it harden and set. 10. Bon appetit! 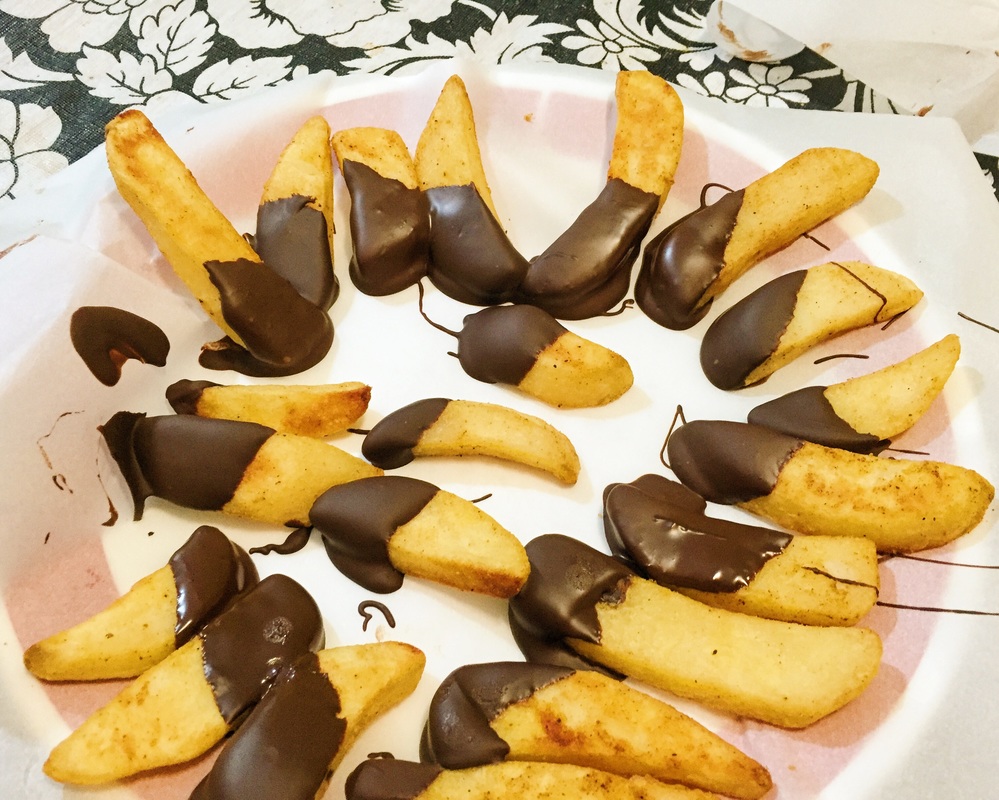 Recently, the Internet was abuzz over a new menu at McDonald's restaurants in Japan: chocolate-covered French fries. This item differs from my recipe in that the chocolate that is covering those fries in Japan is just melted chocolate that has been drizzled on top of the fries. My recipe involves dipping the fries in melted chocolate and then letting the chocolate harden and set in the fridge, which in my opinion is even better than just a chocolate drizzle. Plus this recipe is super simple- it only requires 2 ingredients! From the picture, the fries look like chocolate covered bananas(which are yummy too in its own right). My dad(the notorious picky eater) tried these fries and said these were one of the best recipes I have made for him, which says a lot. I didn't fully coat each fry in chocolate because: A) It would be way too messy and B) I want you to see some of the starchy goodness that is the French fry. Also, I decided to use steak fries instead of shoestring fries because dipping the latter would be way too messy. The theme of this recipe is basically simplifying as much as possible. This is probably the easiest recipe I have done to date(or at least the one that uses the least number of ingredients). Once you cook the steak fries, let them cool off for 5-10 minutes before dipping them in chocolate- not only do you not want to burn your hands touching freshly cooked fries but you want the chocolate to have the best chance of hardening on top of the fries. As for the baking chocolate, you can use whatever type you want but I used two types that may look similar but in composition, clearly aren't: German baker's chocolate(which is 48% cacao- somewhere in the middle between milk chocolate and dark chocolate) and dark chocolate. You will need: For the cooking equipment: 2 small bowls Parchment paper A large plate For the fries: About 30 cooked steak fries 8 ounces of baking chocolate 1. Melt the baking chocolate. If you're using more than one type of chocolate, put each type of chocolate in its own small bowl and microwave according to the package instructions the chocolate came in. For the chocolate I used, it took 1 minute and 20 seconds to fully melt the chocolate in each bowl but your mileage may vary. 2. Cover a large plate with parchment paper. 3. Dip the top half of each fry into the melted chocolate and place each dipped fry on to the plate lined with parchment paper. 4. Put the fries in the fridge to let the chocolate harden and set for 15 minutes. 5. Bon appetit! It's storytime! The Meatloaf Princess was abducted by aliens who decided to coat her in panko breadcrumbs and cocoa powder, fry her, and then eat her! All that was left of her was her skeleton. The end. THE FOOD THEME OF THE MONTH IS CHOCOLATE, BTW. This story obviously never happened since I am here to tell the tale, but it was my dad's failed attempt to turn me into a vegetarian after I kept feeling so smug about frying these little fish from the North Atlantic with their heads decapitated(that's the way I bought them at the supermarket that used to be a PathMark but is no longer. I asked the lady at the fish counter why the smelts' heads were cut off and she looked at me like I was crazy(or like my mom used to say, as if I had 10 heads). She then retorted, "Why would you want to eat the heads!?" I didn't respond but fact: fish heads are a culinary delicacy in many Asian cuisines. When it comes to meat and fish, I'm game to try anything once, even fish heads. The only fish my dad eats are tuna, fish fillets, and fish sticks, so I guess he isn't used to seeing an almost whole fish with the skeleton intact being fried. The fish may look thick, but they fry pretty quickly, like under 2 minutes on each side. I didn't mention this in the video but the fish tasted like cod or flounder. I only realized this after I stopped recording. It isn't possible to remove the skeletons of the smelts before frying them. I tried. But after frying the fish, it is possible, as the meat falls off the bone. I wish I had tartar sauce but I didn't. Regardless, fried smelt tastes great when dipped in ketchup or ranch dressing, which is the closest thing i had to tartar sauce. But what makes the fish chocolate? I mixed panko breadcrumbs with cocoa powder to get a breading that looks like Cocoa Krispies. Due to the length of the fish, they couldn't be dredged in egg in a small bowl, so I used a large plate, though it may look weird seeing beaten and whisked eggs on a plate and not a bowl. It's important to use unseasoned breadcrumbs so that none of the extra seasoning in seasoned breadcrumbs doesn't overpower the cocoa powder. You will need: For the cooking equipment: 3 large plates A large bowl A frying pan A fork For the fried smelts: 1 pound of smelt, decapitated and gutted 2 beaten and whisked eggs 3 cups of all-purpose flour 3 cups of unseasoned panko breadcrumbs 2-3 tbsp. of cocoa powder Pinch of salt Canola oil for frying Ketchup, ranch dressing, or tartar sauce for dipping(optional) 1. Pour the beaten and whisked eggs onto a large plate. 2. Put the flour onto a second large plate. 3. Put the unseasoned panko breadcrumbs into a large bowl. 4. Mix the cocoa powder and salt with the breadcrumbs until you get a breading that looks like Cocoa Krispies. 5. Dredge the smelt in the flour, then egg, then cocoa breading. 6. Put the breaded fish onto a large plate. 7. Pour canola oil into a frying pan and heat the oil up. 8. Once the oil is heated up, drop the breaded smelts into the frying pan. You'll probably need to make several batches. I needed three batches myself to fry all the smelts. 9. Let the smelts cook for 1-2 minutes before turning them over with a fork. 10. Let the smelts cook for another 1-2 minutes on the other side. Note: for each new batch, you should add a tiny bit of more canola oil into the frying pan so that all the remaining fish can be fully fried. 11. Serve with ketchup, ranch dressing, or tartar sauce for dipping(optional). Bon appetit! How to eat the smelts: Every part of the smelt except for the bones(which are primarily on the skeleton) is edible, even the fish skins. When the fish is done frying, you should be able to easily separate the bones from the rest of the fish. My dad thought fish skins were inedible but with such a tiny fish like a smelt, it's impossible to remove the meat from the skin, so you might as well eat the skins. A few years ago, I first learned of langoustines on MasterChef when there was a Pressure Test involving cooking a langoustine dish. I remember Gordon Ramsay saying langoustines are a luxury ingredient because when they are fresh, they are only good for 24 hours if you want to cook them whole after the langoustines die. Looking back on that memory, I thought to myself that I would never get to make a meatloaf with langoustines in it due to their rarity and expense- until I went to Trader Joe's a few weeks ago and found frozen langoustine tails for sale! When I go to a supermarket and I find a rare ingredient I would like to use in one of my recipes for this channel, I rarely pass the opportunity to purchase said ingredient. 12 ounces of langoustine tails is $11.99 where I'm from, so it's not like it's as expensive as good caviar. After doing some research on the langoustine, I found out that it is a cross between a crayfish(not a crawfish) and a lobster, but the tails are the size of one whole shrimp usually. Only the tails and claws of langoustines are edible. It turns out people use langoustines at barbecues(like Jamie Oliver) and I had some BBQ sauce on hand, so I decided to make a BBQ meatloaf with langoustines. The tails I bought were safe to eat raw, so I hypothesized correctly that langoustines wouldn't take long to cook in an oven, hence the usage of unsweetened applesauce in lieu of eggs for this recipe. Normally when I mix up the ingredients in a meatloaf recipe, I use my(washed) hands, but for some reason my dad insisted it would be gross to use your hands to mix up a meatloaf mixture with BBQ sauce(I don't know the reasoning behind his logic), so at his request I used a spoon to mix up the ingredients. After eating a few bites of the meatloaf, I realized it was missing something and I thought of all the good times I had at Red Lobster eating lobster with butter. So I put butter on top of this meatloaf and it tasted even more delicious! The butter really makes the meatloaf extra decadent. You will need: For the cooking equipment: A lasagna pan Nonstick cooking spray For the meatloaf: 2/3 tbsp. of onion powder 2/3 cups of unsweetened applesauce 1/2 cup of your favorite BBQ sauce Pinch of paprika Pinch of garlic powder Pinch of black pepper Pinch of salt 1 cup of breadcrumbs 12 ounces of langoustine tails Butter to top the meatloaf(optional) 1. Put all meatloaf ingredients in a large bowl. 2. Mix up all the ingredients using a spoon so that all the ingredients are distributed evenly among the mixture. 3. Spray a lasagna pan with nonstick cooking spray. 4. Form 2 loaves. 5. Bake in a 350 degree Fahrenheit oven for 10-15 minutes. 6. Top with butter(optional). Bon appetit! |
Archives
October 2019
Categories
All
|


 RSS Feed