|
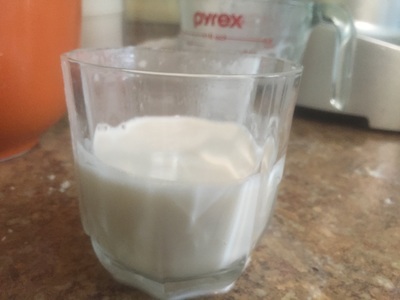
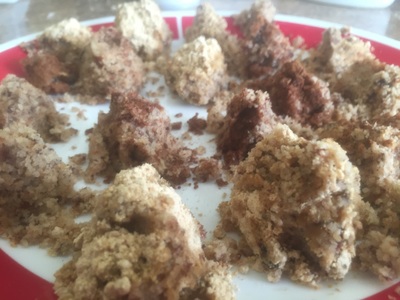
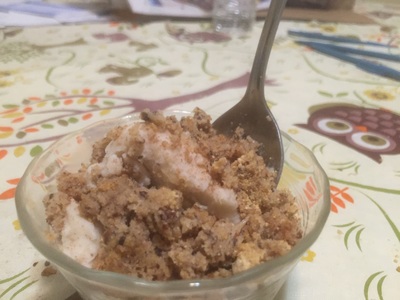
I didn't realize making this ice cream was such a monumental task until I edited the video of me actually making the three components of the sundae(the milk, the balls, and the ice cream itself). This video clocks in at 11 minutes and 53 seconds, which is almost 30 seconds shorter than the longest video on my channel(the Tofu Meatloaf Birthday Cakes). But it was so cool being able to turn(soaked) nuts into vegan milk that actually looks like cow's milk! Of course, you can't just put a bunch of nuts in a blender with some water and a vanilla bean, and hope it turns into milk. You have to strain the solids(the nut pulp) from the liquid(the actual milk), using a nut milk bag. See HELPFUL LINKS below on where to purchase a nut milk bag. This will be probably be the closest thing I get to actually milking a cow. I went to a local farm when I was kindergarten and when my class got to see the cows, they smelled horrible, so I looked away from them in the photo of me next to them. Straining the nut milk is almost like milking a cow- you squeeze up then down(and if you're thinking of something sexual from this sentence I just wrote, then get your mind out of the gutter!). I didn't want to discard of the nut pulp because I knew there were ways to cook with it, so I stumbled upon this YouTube video from Nadia's Healthy Kitchen(her channel is at https://www.youtube.com/user/NadiasHealthyKitchen): https://www.youtube.com/watch?v=vst55OXB9fo. The video used almond pulp instead of Brazil nut pulp, but you could use Nadia's recipe for almost any type of nut. Unlike Nadia, I didn't have any cocoa powder on hand, so I used peanut butter powder instead. This ice cream sundae recipe I made produces 1 quart of ice cream! That's enough for 12 half-cup servings! I only finished the ice cream last night. My dad tried the ice cream off camera and he didn't like it, so I didn't record him in this video because he would've spat out the ice cream. He said it was too nutty. The pulp balls are good for 7 days. Inspirations for this recipe: https://elanaspantry.com/brazil-nut-milk/, https://www.youtube.com/watch?v=vst55OXB9fo, and http://learnrawfood.com/recipes/comments/brazil-nut_vanilla_ice_cream/#.V8H2go72TNk. HELPFUL LINKS: Nut milk bag: https://www.amazon.com/Pro-Quality-Nut-Milk-Bag/dp/B00KLT6X9W/ref=sr_1_4?s=kitchen&ie=UTF8&qid=1472328897&sr=1-4& 1-quart ice cream tub: https://www.amazon.com/Tovolo-Glide---Scoop-Ice-Cream/dp/B00CBFZWHS/ref=sr_1_1?ie=UTF8&qid=1472329105&sr=8-1& Brazil nuts: https://nuts.com/nuts/brazilnuts/raw-noshell.html Vanilla bean: https://nuts.com/cookingbaking/beans/vanilla.html Brazil nut butter: http://www.rejuvenative.com/products/Brazil-Nut-Butter.html You will need: For the cooking equipment: For the Brazil nut milk: A large bowl Aluminum foil A colander A medium bowl A blender(preferably a Vitamix) A nut milk bag(see HELPFUL LINKS) A 2-cup measuring cup For the Brazil nut pulp balls: A medium bowl A lasagna pan 2 small bowls A large plate For the ice cream: A large bowl An ice cream maker(I use a Cuisinart brand maker) An ice cream tub(see HELPFUL LINKS) For the ingredients: For the Brazil nut milk(makes 4 cups of Brazil nut milk): 2 1/2 cups of raw, shelled Brazil nuts(see HELPFUL LINKS) 1 vanilla bean(see HELPFUL LINKS) Water to cover the Brazil nuts and vanilla bean 4 cups of water to make the actual nut milk For the Brazil nut pulp balls(makes 20-30 balls): Brazil nut pulp separated from the Brazil nut milk 4 dates(like Nadia used) or 6 ounces of a combination of raisins and Zante currants 2 tbsp. of nut butter(I used peanut butter because I was low on Brazil nut butter) 1 tsp. of vanilla extract 1/4 tsp. of salt 1/4 cup of raw, shelled Brazil nuts 1/4 cup of fig preserves(or any fruit spread) For the ice cream: 4 cups of Brazil nut milk 1 tbsp. of vanilla extract 1/4 tsp. of salt 1 cup of honey 3/4 cup of Brazil nut butter(see HELPFUL LINKS) Brazil nut pulp balls For the Brazil nut milk: 1. In a large bowl, cover the vanilla bean and Brazil nuts with enough water to cover them. The nuts will float to the surface but that's normal. 2. Cover the large bowl with aluminum foil and put the large bowl in the fridge overnight, or for at least 8 hours, to let the nuts and bean soak. 3. Drain the liquid from the bean and nuts with a colander. Put the drained bean and nuts back into the large bowl. 4. Put the drained nuts and bean, and the 4 cups of water into the blender. 5. Put the lid on the blender and blend for 1 minute, or until creamy. 6. Put the nut milk bag over the 2-cup measuring cup. Pour the creamy mixture from the blender through the nut milk bag. 7. Let the milk leak into the measuring cup by squeezing the bag from top to bottom. Squeeze out as much milk as possible. 8. Put the milk and pulp(the solids that are in the nut milk bag) into separate bowls. I used a large bowl for the milk and a medium bowl for the pulp. 9. Sweeten with something like chocolate syrup if you want to drink it. Bon appetit! For the Brazil nut pulp balls: 1. Put the pulp and dates(or mixture of Zante currants and raisins) into the food processor bowl. Put the lid on the bowl and process the two until you get a crumbly mixture. 2. Add the nut butter, vanilla extract, and salt. Put the lid on the bowl and process everything. 3. Add the Brazil nuts and preserves. Put the lid on the bowl and process everything until you get a slightly sticky mixture. 4. Form little balls out of the mixture. This step took me 40 minutes. You can do this by using your hands. Put the balls into a lasagna pan. 5. Let the balls harden in the fridge for 30-60 minutes. 6. Put cinnamon and peanut butter powder into separate small bowls. Coat each ball in either the cinnamon or peanut butter powder. Bon appetit! For the ice cream: 1. Pour the Brazil nut milk into a clean blender. Add the next 4 ice cream ingredients. Put a lid on the blender and blend until the contents are creamy and mixed. 2. Pour the ice cream mixture into a large bowl. Chill the ice cream mixture in the fridge for at least 2 hours but no longer than 2 days. 3. Turn on your ice cream maker and pour the ice cream mixture into the bowl that's part of the ice cream maker. DO NOT OVERFLOW THE BOWL OF THE ICE CREAM MAKER!! 4. Follow the directions on how to make ice cream according to your ice cream maker manual's instructions. For mine, I churned it for 15 minutes. 5. After churning for 15 minutes, I crumbled the pulp balls to the size of chocolate chips and then put them into the ice cream maker. DO NOT OVERFLOW THE BOWL OF THE ICE CREAM MAKER WITH PULP BALLS! Let the ice cream churn for an additional 5 minutes(or whatever your manual says). 6. Remove the lid when the ice cream mixture is done churning. Put half of the ice cream into an ice cream tub. Top the ice cream with more nut pulp balls(crumbling them is recommended). Cover the pulp balls with the rest of the ice cream. 7. Put the lid on the ice cream tub and put the ice cream into the freezer overnight, or for at least 2 hours, depending on how hard you want your ice cream. 8. Top with crumbled up pulp balls. Bon appetit!
1 Comment
10/13/2019 09:20:58 am
Usually I never comment on blogs but your article is so convincing that I never stop myself to say something about it. You’re doing a great job Man,Keep it up<a
Reply
Leave a Reply. |
Archives
October 2019
Categories
All
|


 RSS Feed